The Zippy Strippy Quilt

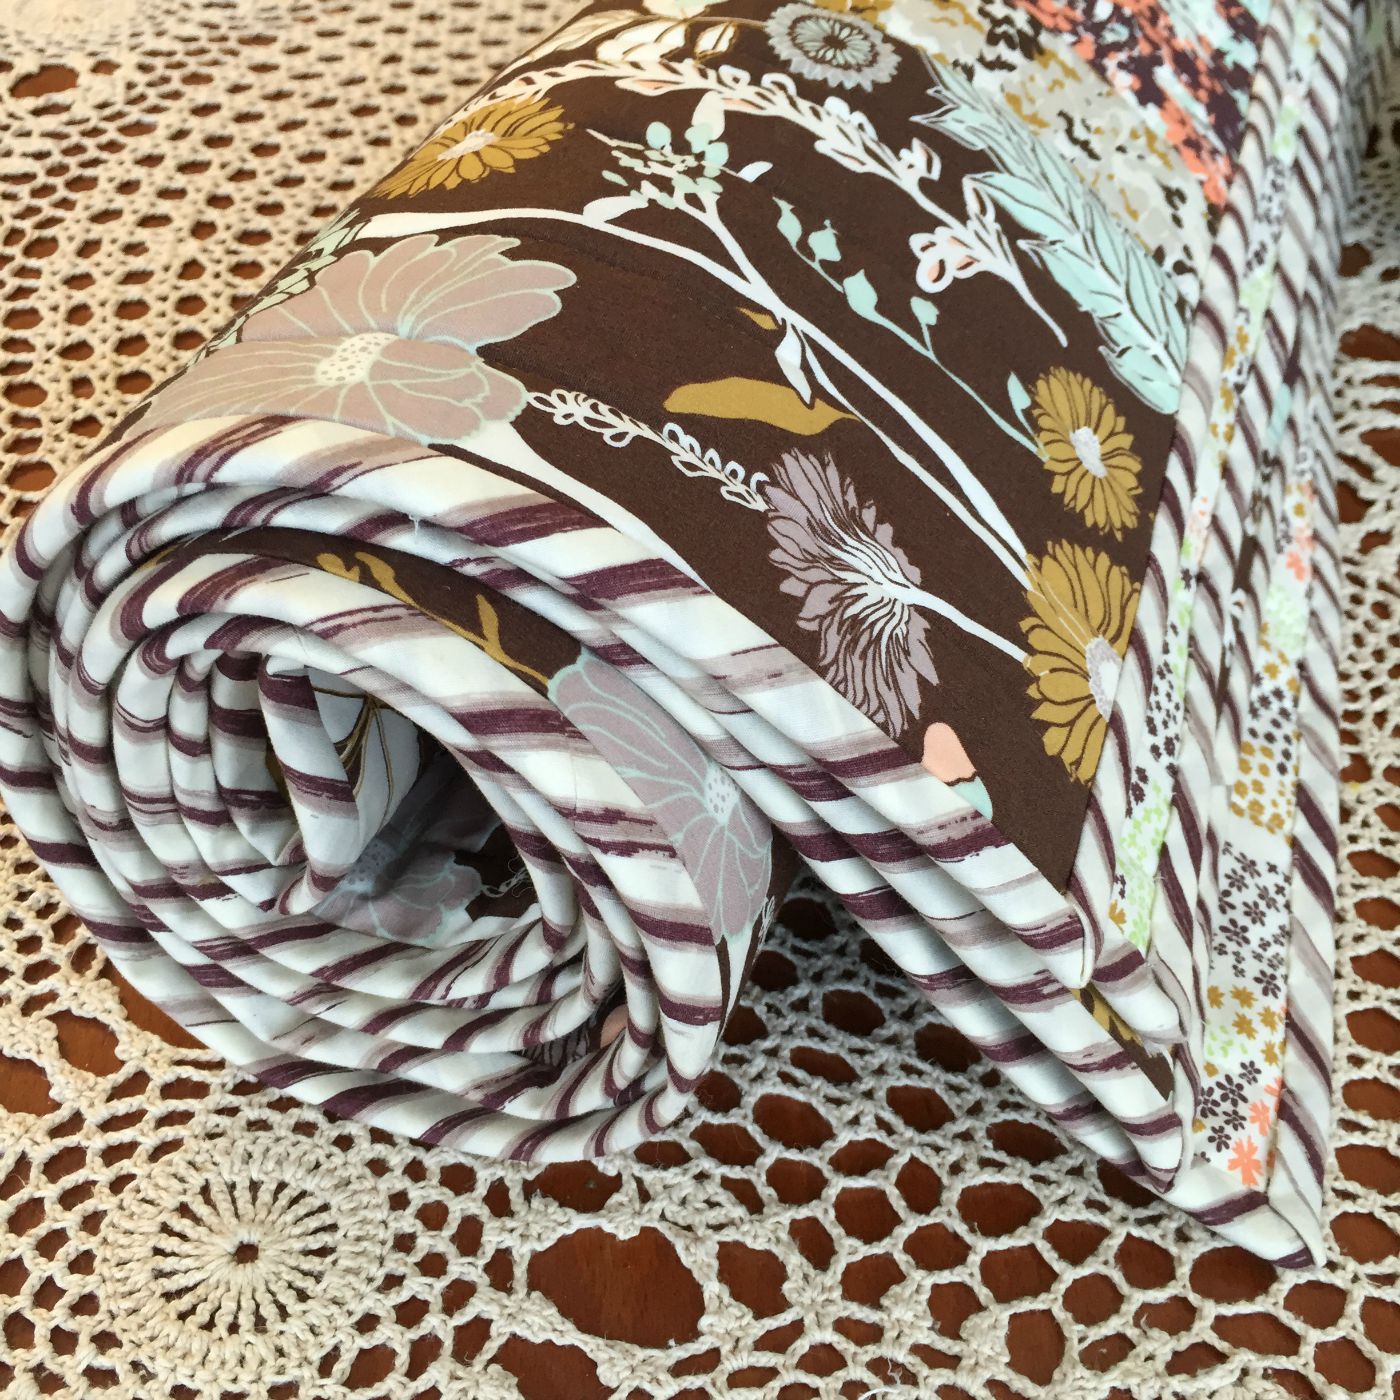
Need a fast, easy quilt design? This is it...make it in an evening, quilt it and bind it the next day. Honestly, it's that easy! I designed this pattern to showcase larger print fabrics that seemed just too pretty to cut into smaller pieces. Because you can utilize 14 different prints,  I've used it several times at my quilt store when I needed to show how a full line of fabric plays together. I call it Zippy Strippy, and you can see it below in Bonnie Christine's Cultivate fabric that she designed for Art Gallery Fabrics. Measuring at about 60" x 72", it's perfect for a sofa throw or youth bed. If you like it, you'll find the pattern on my downloadable pattern page!

Cultivate fabrics by Bonnie Christine play together beautifully in this fast, easy quilt.

Simple, straight line quilting with 100% organic cotton batting, and co-ordinating fabric on the back kept this quilt soft, drapey and snuggly! If you've ever sewn with Art Gallery's fabrics, you already know the difference their pima cotton makes in all your projects from quilts to clothing!

Zippy Strippy Quilt in Cultivate Fabrics by Bonnie Christine.

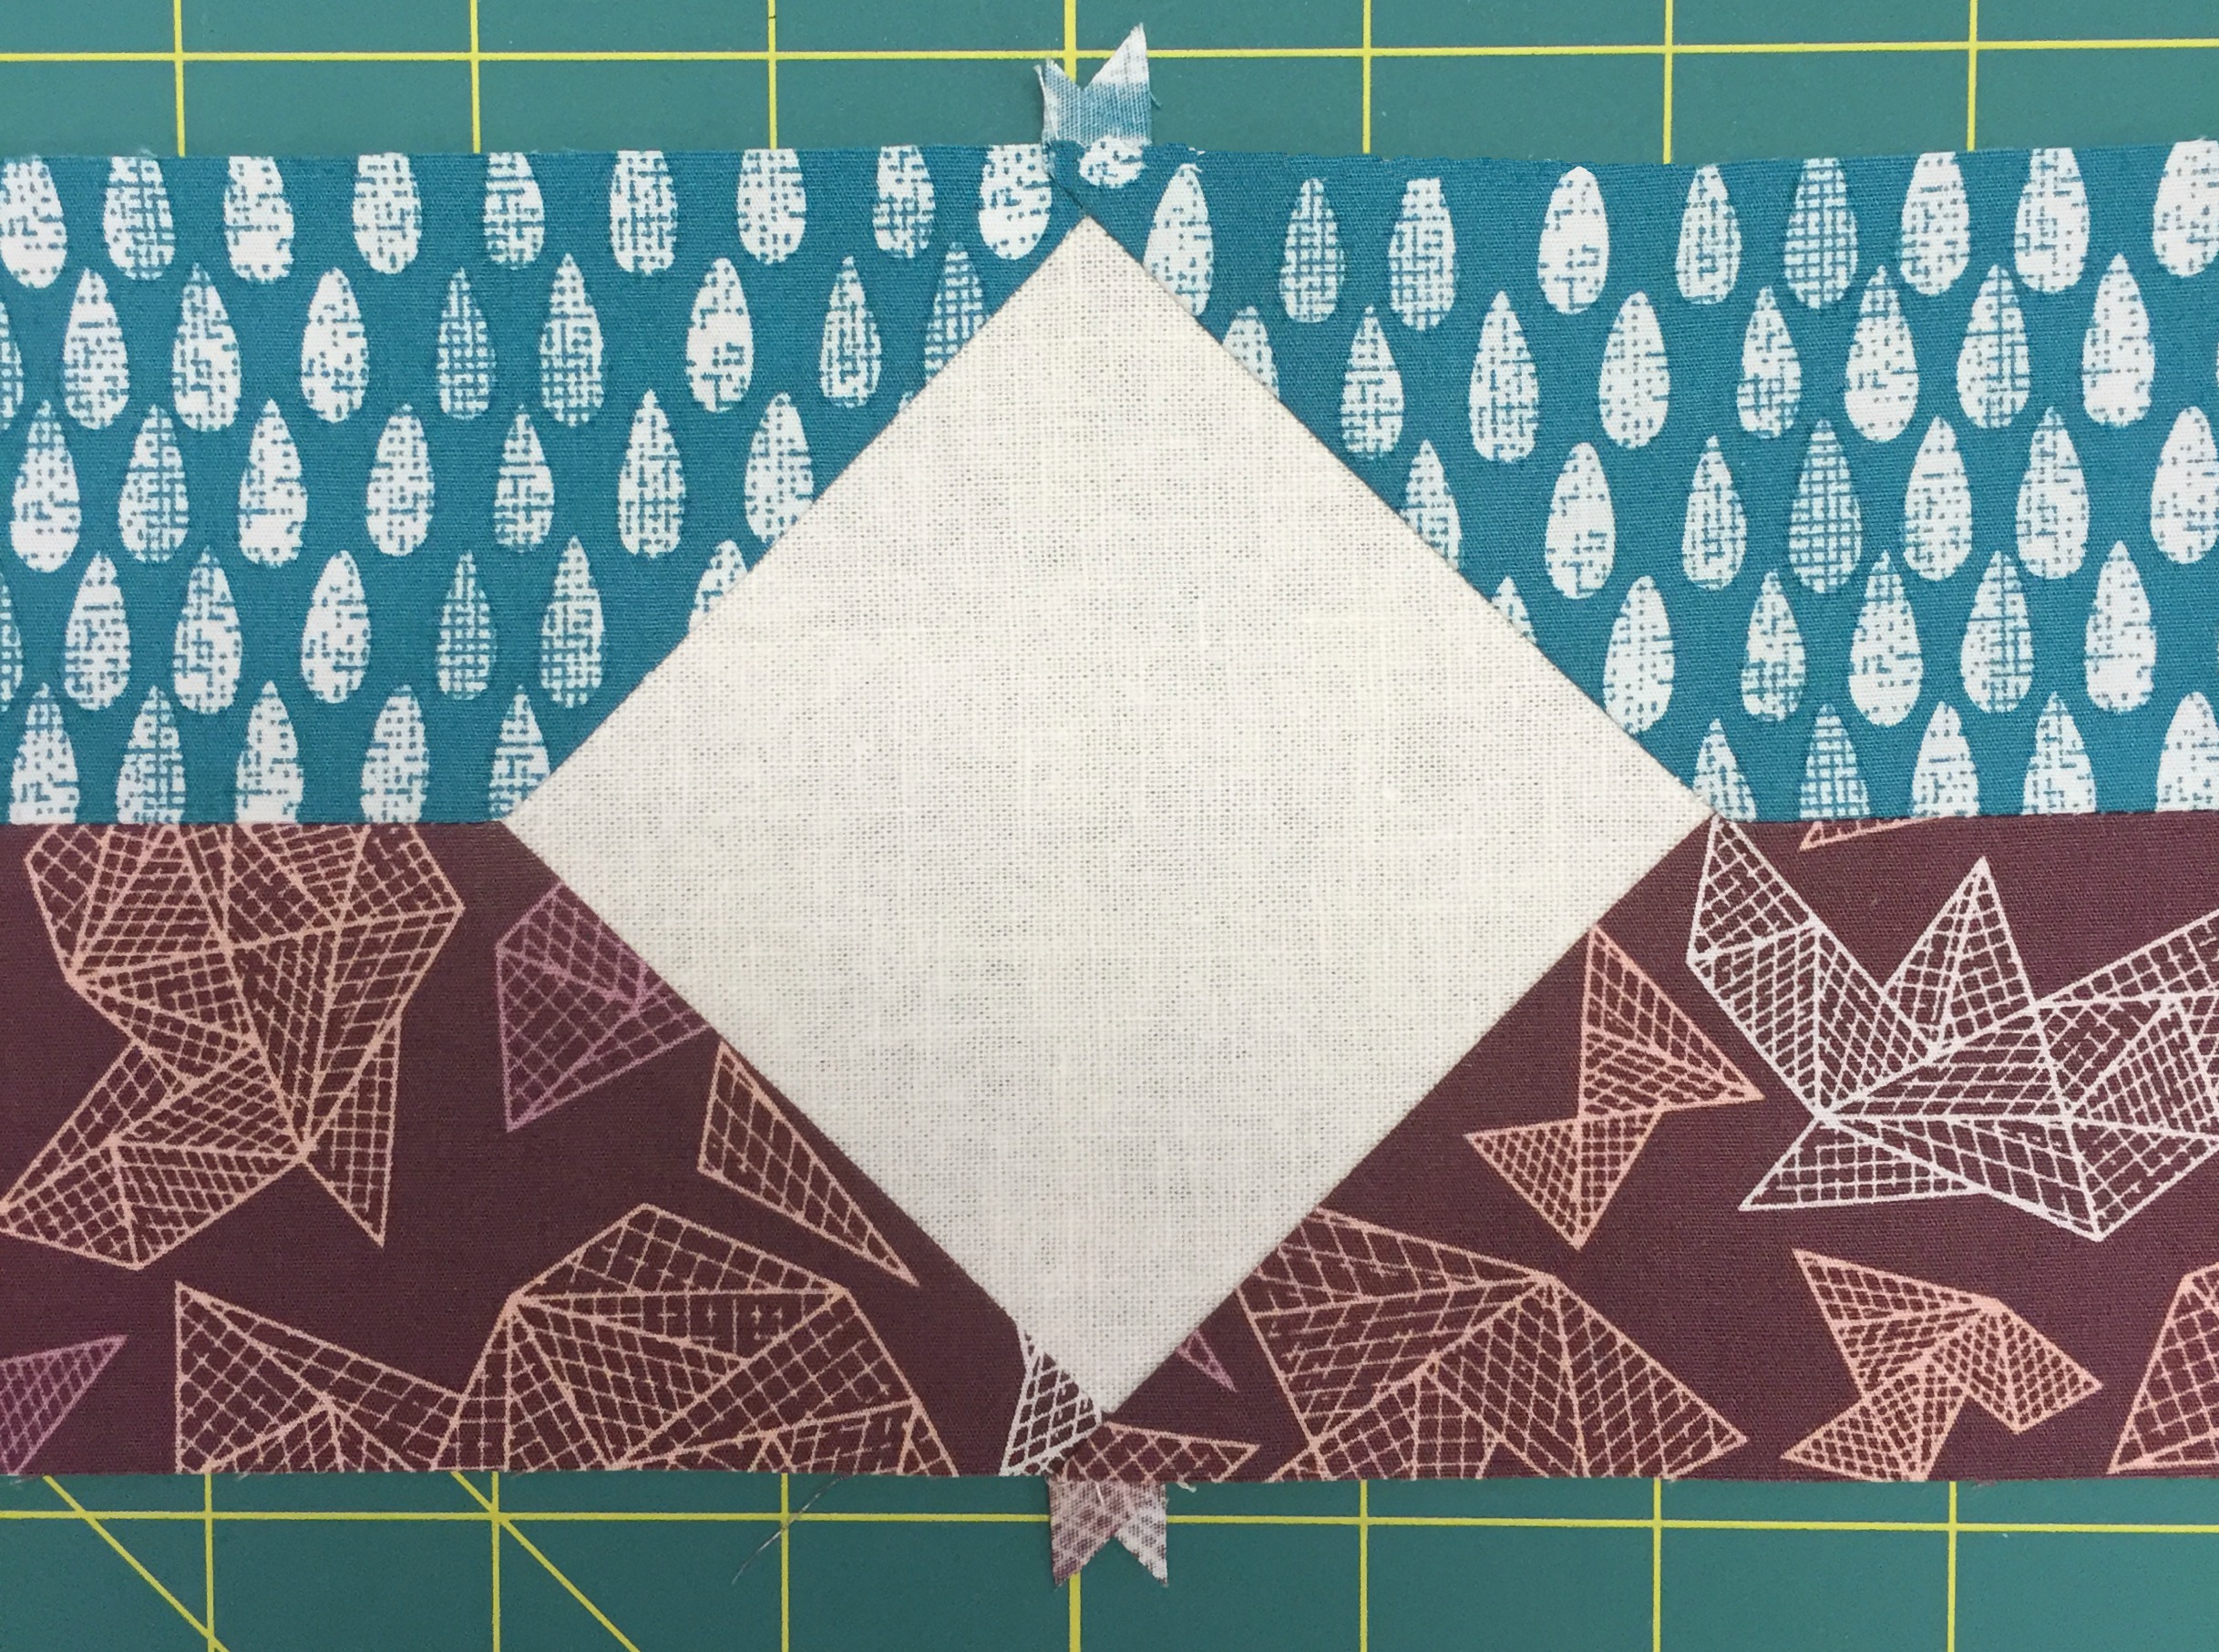
I used 12 fabrics for the center strips and two for the two side borders. Actually, there is a 15th fabric used for the bias binding! Isn't this little stripe great? We've included it in the kit, along with all the fabric shown for the top. Backing is available separately.

Bias binding from Cultivate fabrics by Bonnie Christine.

Thanks for visiting! Happy sewing and God bless! Maxie


Maxie Makes 'Modern to a T' Quilt, a Video Tutorial!

Video tutorials are my favorite things to share with you! Today, I'm bringing you a special pattern that I reworked from a vintage quilt that featured a block popular around 1890. Can we make this modern? Why, yes, we can! I'll show you how in the video below!

While strolling in an antique shop in Asheville, NC, I came across the quilt pictured below. The binding was tattered and almost disintegrated. Hand quilted and hand pieced, it was heavy with the cotton batting so familiar in the old quilts I slept under at my grandmother's house. Maybe that's why I was so drawn to it. I inspected the blocks and saw that it was made with quilt units familiar to most quilters. I felt that this quilt would be a cinch to make, even for a beginner. Watch the video for even more facts about the quilt, and I'll give you some tips and tool ideas that will make it easier than you can even imagine.  Two products help to make the piecing more accurate and timesaving:  Triangulations and the Flying Geese Bloc Loc Ruler, both available on my shopping page, as well as a fat quarter bundle to make the quilt in the colors shown! The pattern is provided with the fabric bundle. Oh, yes! I have a surprise at the end of the tutorial, so, grab a cup of coffee and let's get started!

Double T Quilt Block
The unveiling of the 'Modern to a T' Quilt!

I hope you enjoy today's video...please leave me a comment so that I know you were here. Happy Sewing and God bless! Maxie


Quilting with Dresdens & Prairie Points

I'm loving Dresden Plate quilts these days! I attended International Quilt Market last week and it seems that I'm not the only one enamored by the design! I especially loved the double pointed Dresden designs from Susan Cleveland of Pieces be With You. So, I came home and adapted the design for a pillow.

Dresden Plate Pillow

Using an 18º Dresden ruler, I cut twenty 4" wedges. Make both ends of the wedges pointed and sew them all together as follows:

  1. Fold a wedge in half lengthwise, right sides together.
  2. With a 1/4" seam allowance, stitch straight across each of the narrow ends. Finger press the seams open, with the tiny triangle at the tip laying flat. Turn right side out, using a point turner to get a nice point at each end. Press well.
  3. Arrange wedges to your liking. Using a 1/4" seam allowance, sew five Dresden wedges together. Press well. Lay the 5 piece section on a gridded rotary mat to make sure it is nice and square. The raw edges will extend 1/4" over grid lines, but make sure it's square and flat. If not, adjust seam allowances and restitch.
  4. Construct four sections in this manner and then sew them all together to create the circular Dresden Plate.

Applique´ the Dresden Plate to a 16" square of background fabric. See last Friday's post for instructions and a video on the stitching the applique´. To center, press the square in half vertically and then again horizontally to form crease lines. Line up the crease lines with opposing seams in the Dresden plate, as shown below. Pin in place, then stitch.

How to prepare a dresden plate for applique´.


Layer the 16" Dresden plate block with batting and backing and quilt as desired. I stitched in the ditch around the Dresden Plate, and then echo quilted around the outside tips twice. (See photo, below, right.) I finished the remaining portions with a loop meander to create texture.

The photo on the left shows how great Baby Lock's Free Motion Echo Quilt foot works for applique´with the feed dogs raised (see last Friday's post), and the photo on the right shows how great it works for echo quilting with the feed dogs dropped! This foot has many registration marks to help you keep your stitches just where you want them. Use it with the pivot feature and the needle placement feature engaged for stressless sewing!

Using the Echo Quilting Foot for applique´or quilting.

After quilting, I made prairie points from 3 1/2" squares. Nine (9) points fit perfectly on each side, requiring a total of 36 points. You'll find a wonderful article on McCall's Quilting website on how to make prairie points and how to nest them. Pin, then baste them in place around the outer edge of the pillow top. If you'd like to make continuous prairie points from one fabric, I'll refer you to my blog post for those instructions and my video tutorial here.

How to make a Dresden Pillow with Prairie Points.


To make an envelope pillow back, cut a 16" length of 44" wide fabric. Cut on the fold to make two pieces 16" wide x about 22" long. Remove the selvage edge. Press each piece in half along the 16" width, as shown below in the first photo. (Click on the photo to enlarge it.)

Place one piece of backing fabric on the pillow, right sides together, with the raw edges lining up with the outside raw edges of the pillow. (Center photo.) Place the remaining backing piece on top of everything, again aligning the raw edges. The folded edges of the backing will overlap each other by about 4 or 5 inches. (Right photo.)

Stitch around the entire pillow, about 1/4" seam allowance, making sure to have all the raw edges of the prairie points enclosed in the seam allowance.

Turn your pillow right side out. Use a point turner for the corners and press well.

For the inside pillow, I purchased a pre-made 16" pillow form. Insert through the opening in the back of the pillow. Enjoy!


Invisible Machine Applique´Made Easy!

I'm currently working on an applique´project for an upcoming class and thought I'd share a couple of my favorite techniques with you today. If you love the look of applique´, but don't have the time to spend on handwork, try using your machine! (See my video below.) With these tips, you can achieve a hand-sewn look in a fraction of the time.

Machine Applique´


My very favorite thread for machine applique´ is Superior Thread's Monopoly thread. This is a very fine, clear polyester thread that I find to be trouble free on any sewing machine. In fact, I use it on both my long arm machine and my conventional machines. It's worlds away from the old nylon clear thread that we used in the past. This thread is soft , won't melt when ironed or harm the cotton fibers in your project.

Using the Echo Machine Quilting Foot For Applique´

I have found the best presser foot for stitching applique´ to be the Echo Quilting Foot. That's right, it's usually used as a free motion foot, but it is designed to work with the feed dogs in the up position, too! Several things make this the best foot for the job. First of all, it's clear: you can see the fabric's edge underneath, making it easier to place your stitches right where you want them. Second, there are registration marks of all kinds on the foot, making it easy to keep your fabric where you want it! And last, but not least, this large foot is slightly cup shaped so that it can easily glide over the edges of your applique´without accidentally flipping a delicate edge over. This foot is included with many Baby Lock machines, and is available for all models. Check your machine brand to see if there is a comparable one available for your machine.

Watch the foot in action! I raised the foot once or twice so that you could better see the way the registration marks and the shape help. Click on the image to watch.

Here's a sneak peek at my project! I'll share the completed project in another blog post.

Invisible Machine Applique´

Thanks for visiting! Happy sewing and God bless! Maxie


Don't Fear the 'Y Seam'.

I promise 'Y Seams' are easy. Not sure what a 'Y Seam' is? Just as the name implies, it is three seams that come together at one point and form the shape of the letter 'Y'. Dissect a Y and you have three lines. Stitching such a seam is really very easy, but most quilters avoid doing so because they don't understand the construction or they think it might be too time consuming. Let's dispel those fears! I made the hexagon quilt below, and every seam is a 'Y Seam'! (Free pattern by Bonnie Christine and Maxie Makes!) Kit with precut hexies here.

The Honey Pot Quilt

This quilt really went together pretty fast, because there are no blocks to piece, and only simple seams to sew the hexies together. The picture below is a quilt unit from my current project that includes several 'Y Seams'. (At the end of this post is a link to the designer's website, where you'll find great construction tips and the free pattern for the quilt!)

Sewing Perfect 'Y Seams'

So, you see above two fabric strips that have a linen square sewn between them, in the seam. When I first saw the picture of this quilt on The Purl Bee's blog, I thought the squares were applique´d in place. Ah, no, those are all 'Y Seams'. Ok! The first step is to cut the ends of each of the four strips at 45º angles. The Purl Bee's blog shows how to prepare these strips. They are then sewn together, forming the first seam of the 'Y'.

Sewing a 'Y Seam'.
  1.  The photo on the left shows the 1/4" seam allowance drawn on all four sides of the square that will be sewn into the 'Y seam'. I used an iron-off marker, but this is really like training wheels on a bike. You can draw them on a few, but in no time at all you'll understand how the seam is constructed and you'll abandon the pen.
  2. Pin in place and stitch the seam, beginning and ending where your lines intersect. Be sure to secure the stitching at the beginning and ending of the seam. Tip: for a perfectly flat seam, stop just prior to reaching the intersection, just about the distance of one stitch length. Likewise, when you begin the seam, move just one stitch length away from the intersecting lines.
Sewing a 'Y Seam'
  1.  Remove the pieces of fabric from your machine. Line up the raw edges of the fabrics for the other seam. To do so, you'll need to fold your previously sewn seam out of the way.
  2. This laser guidebeam sure comes in handy when sewing across lines, especially imaginary lines! (Thank you, Baby Lock!) Another good excuse to ditch the marking pen! Stitch from point to point and press your seams so that everything is nice and flat!
Perfect 'Y Seams'!

This little quilt will be my version of the Agate Quilt from The Purl Bee. I'll share more of my quilt in a few days...it must be ready for Spring Quilt Market in less than 2 weeks!

Thanks for visiting! Now let's show those 'Y Seams' that we have no fear! Happy Sewing and God bless! Maxie