
Welcome to your special Member's Only content! On this page, you'll find all your bonus materials, which will include various video tutorials and other supportive files for your Maxie Mail Subscription Sewing Box. Be sure to come back here each month to retrieve your information. And remember, you'll have access to this page for as long as you are a subscriber!
““Hi Maxie! I have subscribed for 3 months now. I’m speechless! I’ve sewn all my life, mostly self taught, but can’t believe how much I learn from your videos. Your subscription boxes are definitely like taking classes! Great job, and thank you!” J G”
September 2019 - The Open Road Runner
Click photo to see the full renovation!
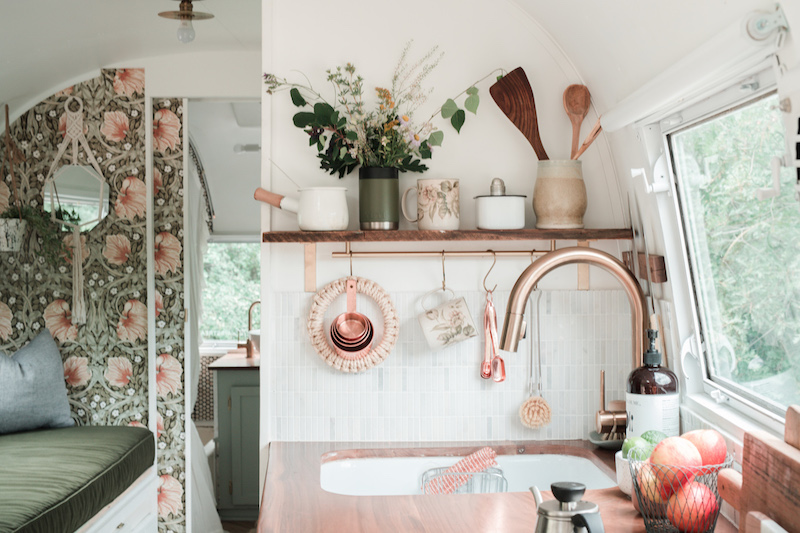
Hello and welcome to September’s tutorial for The Open Road Runner! This project is extra special to me because I chose to use Bonnie Christine’s latest fabric line for Art Gallery Fabrics, The Open Road! Bonnie traveled with her family across the country in her vintage Air-stream, Miss Marjorie (named after the original owner), and gathered inspiration in almost every state to create this line. Want to see Miss Marjorie after Bonnie renovated her? She was recently featured in Country Living Magazine and several other publications, and you can read more about her by clicking the photo at right!

For our project this month you’ll be creating a table runner made with four Impression Quilt blocks, designed by Art Gallery Fabrics. This block was featured when Bonnie’s line was released and I instantly knew that I wanted to bring it to you as a full project! You’ll want to view Art Gallery’s 5 minute video for construction, but be sure to watch my video, below, (no password needed) for some changes made to cutting and sewing the flying geese, and follow my cutting directions in your pattern inside the box to make four Impression blocks. You may notice that there are four flying geese in each block (didn’t I tell you that flying geese are in so many quilt blocks?). Therefore, it will be best to use the technique I taught in last month’s video. My Flying Geese printable instructions are here, and if you are new to Maxie Mail and would like to view that video, scroll to the August Ghosts and Geese post on this page and use this password for access: boo
I’m so pleased to send you a custom stencil that I designed just for this project! In the video I’ll show you how to mark and quilt your runner, as well as other options for your stencil. I’ve worked up a few additional designs, photo at left. Can you think of more?

What’s inside your box?
The Open Road fabrics by Bonnie Christine for Art Gallery Fabrics
The Open Road Runner Pattern Instructions
The Open Road Stencil
Gutermann 100% Cotton Thread
Schmetz Quilting Needles, size 75/11
Schmetz Needle Pocket Guide
What will you learn?
Making half square triangles eight at a time.
Using Quilting stencils for marking and quilting.
Using Flying geese in various block designs.
A Special Announcement!
Hello! September’s box is shipping out on Monday, September 30. I’m sorry for the delay (we usually ship around the 25th), but I’ve been so very busy with my new website for you and deadlines! You may notice that I am moving you to a ‘free’ plan for this website and cancelling your payment for October. In early October I will email you all the new details and you will have the opportunity to join the new plan at that time. There are so many things that I can’t wait to share with you, but until then, here is a copy of the email I sent out last week to you (in case you missed it) explaining just a little bit of what’s to come:
Today is the day I share my vision for Maxie Makes with you! I’ve been dreaming of completely re-imagining the way our membership works, and I’ve been diving deep into how to make our place into a community where I can fully support you and where you can support each other.
Before I go further, let me share my story with you. I began sewing at a very young age, learning from my mother and grandmothers. There were cherished quilts made by them, and we made all our clothes. After I married, I continued to sew and opened an heirloom fabric store and began to teach garment sewing. But, remembering my grandmother’s legacy, my dream was to make a quilt, too.
But not just any quilt. I wanted to make a good quilt.
So, I studied and took classes, and eventually opened my own quilt store where I began to teach. My best reward came from showing my students how to have success in their quilting. Helping them achieve skills that allowed them to sew a quilt that they were proud to give and leave as a legacy was my gain as much as theirs.
So, what takes a person from longing to make a good quilt to one who’s sewing contributes to their legacy? I’ve seen it many times over, and it always starts at the very beginning. If you start right, you’ll finish right.

And that’s the journey that I’d love to take you on.
Sew what’s changing? Well, A LOT!
Boxes will ship as normal for this month, but on September 23rd, I will begin transferring your Maxie Mail accounts from a paid account to a free account. Your charges will cease, but you will still have access to the Member’s Only page and all of the video content for your boxes. Don’t worry, you’ll continue to have access to these videos and tutorials during the transition period! (In fact, in the new membership you will have access to ALL of the content here!
Mark your calendars for October 8, when I will be announcing details of a new membership that will make a complete skill set available to you. A beginning to the journey.
We will start at the beginning with the basics (which won’t be as intuitive as you might think!). These are the basic skills you need, but they are often the ones that I see done incorrectly. All skills are not innate and they are going to be a surprise to you!
We will quickly progress from beginning to intermediate to advanced. I don’t like to categorize skills, however, because all levels are within each phase of learning, and we will tap into those levels all along the journey.
As a prior member, you will be offered the opportunity to join this new membership as a founding member at a special price that will be grandfathered in and guaranteed to never increase.
I’ll share more in a few days about what you will find inside our new membership and how it will be organized into a community where you will blossom alongside quilters from all over the world!
Until then, enjoy your September Maxie Mail Subscription Box! Thank you for your subscription and for your friendship. I look forward to the unfolding of our special community!
Blessings to your sewing room!
Maxie
AUGUST 2019 - THE GHOST AND GEESE QUILT

Hello! Get ready to get your learn on this month, because I’ve got a lot packed inside this month’s tutorial! We will be working with Art Gallery fabrics in shades of grey and teal, and a creamy white background, perfect for creating lots of negative space! You’ll learn more about negative space, and what to do with it, in the video tutorial (below)!
Flying geese are one of the most widely used units in quilting designs. Many styles of blocks incorporate these little pieced poultry patches, including sawtooth and variable stars. If you look closely at many designs you’ll find that flying geese components are common. Many times, however, quilters find them difficult to trim or sew into quilts without loosing the points of the goose triangles. Learning to make them easily and accurately will up your confidence level and I hope you’ll find yourself choosing those designs without hesitation!

I’m taking one more opportunity to show you another way to use the “Fussy Cut and Square Up Ruler Set” that was sent in your May “Cool Tools” Box. I’ve changed the set name to “Maxie’s Perfect Trimmers”, but the rulers haven’t changed at all. They are perfect for Half Square and Quarter Square Triangle units and for Flying Geese units, so after this tutorial your skill level with those rulers should be pretty comfortable. Don’t have these rulers? No worries, I will show you how to trim using any regular ruler in the video tutorial! (However…you can find them here!)
I always make my Flying Geese with a fudge factor, which means they will require trimming to exact size before sewing into the quilt or project. It’s a step that is worth the extra effort, and assures that all points are preserved and perfect!
The instructions at left explain how to cut and sew units in any size; click the image to download and print for reference.
There’s much more, too, so be sure to view your video!
What’s inside your box?
Art Gallery Fabrics’ pima cotton prints for quilt top and binding by Katarina Rocella and Art Gallery Studio.
Gutermann cotton thread: White 1006
Sew-Line Styla Water Erasable Roller Pen
Sew-line Aqua Eraser Pen
GEasy Ruler Stickers
Pattern
What will you learn?
How to make Flying Geese, 4 at a time, with a fudge factor!
How to properly trim Flying Geese units.
How to mark and quilt a “ghost” quilt block (and easily remove those markings!)
How to mark your ruler for easy reference.
Different thread options for quilting.
Applying sashing block by block (my ‘cheater sashing trick’!)
The Ghost and Geese Quilt Video - You’ll find your password on the inside of your pattern, top left side.

Thank you for subscribing! I love sewing with you!
Blessings, Maxie
July 2019 - Don’t Dread the Thread!
Note: About 25 of our subscribers were sent the wrong box insert this month! (They look almost identical to May’s “Cool Tools’ insert!) If you received the wrong box insert inside your box, please click here to download the correct file! You’ll want to print and keep the Thread Reference Chart on the back of the brochure, and if you’d prefer we mail yours to you, please let us know and we will be happy to do so!
Hello! It’s July! If you’re not on vacation, chances are that you are outside in the garden or hiking or swimming, right? July is busy like that, so I wanted to bring you something this month that wouldn’t require a time commitment at your sewing machine, but would help you in all your sewing endeavors!
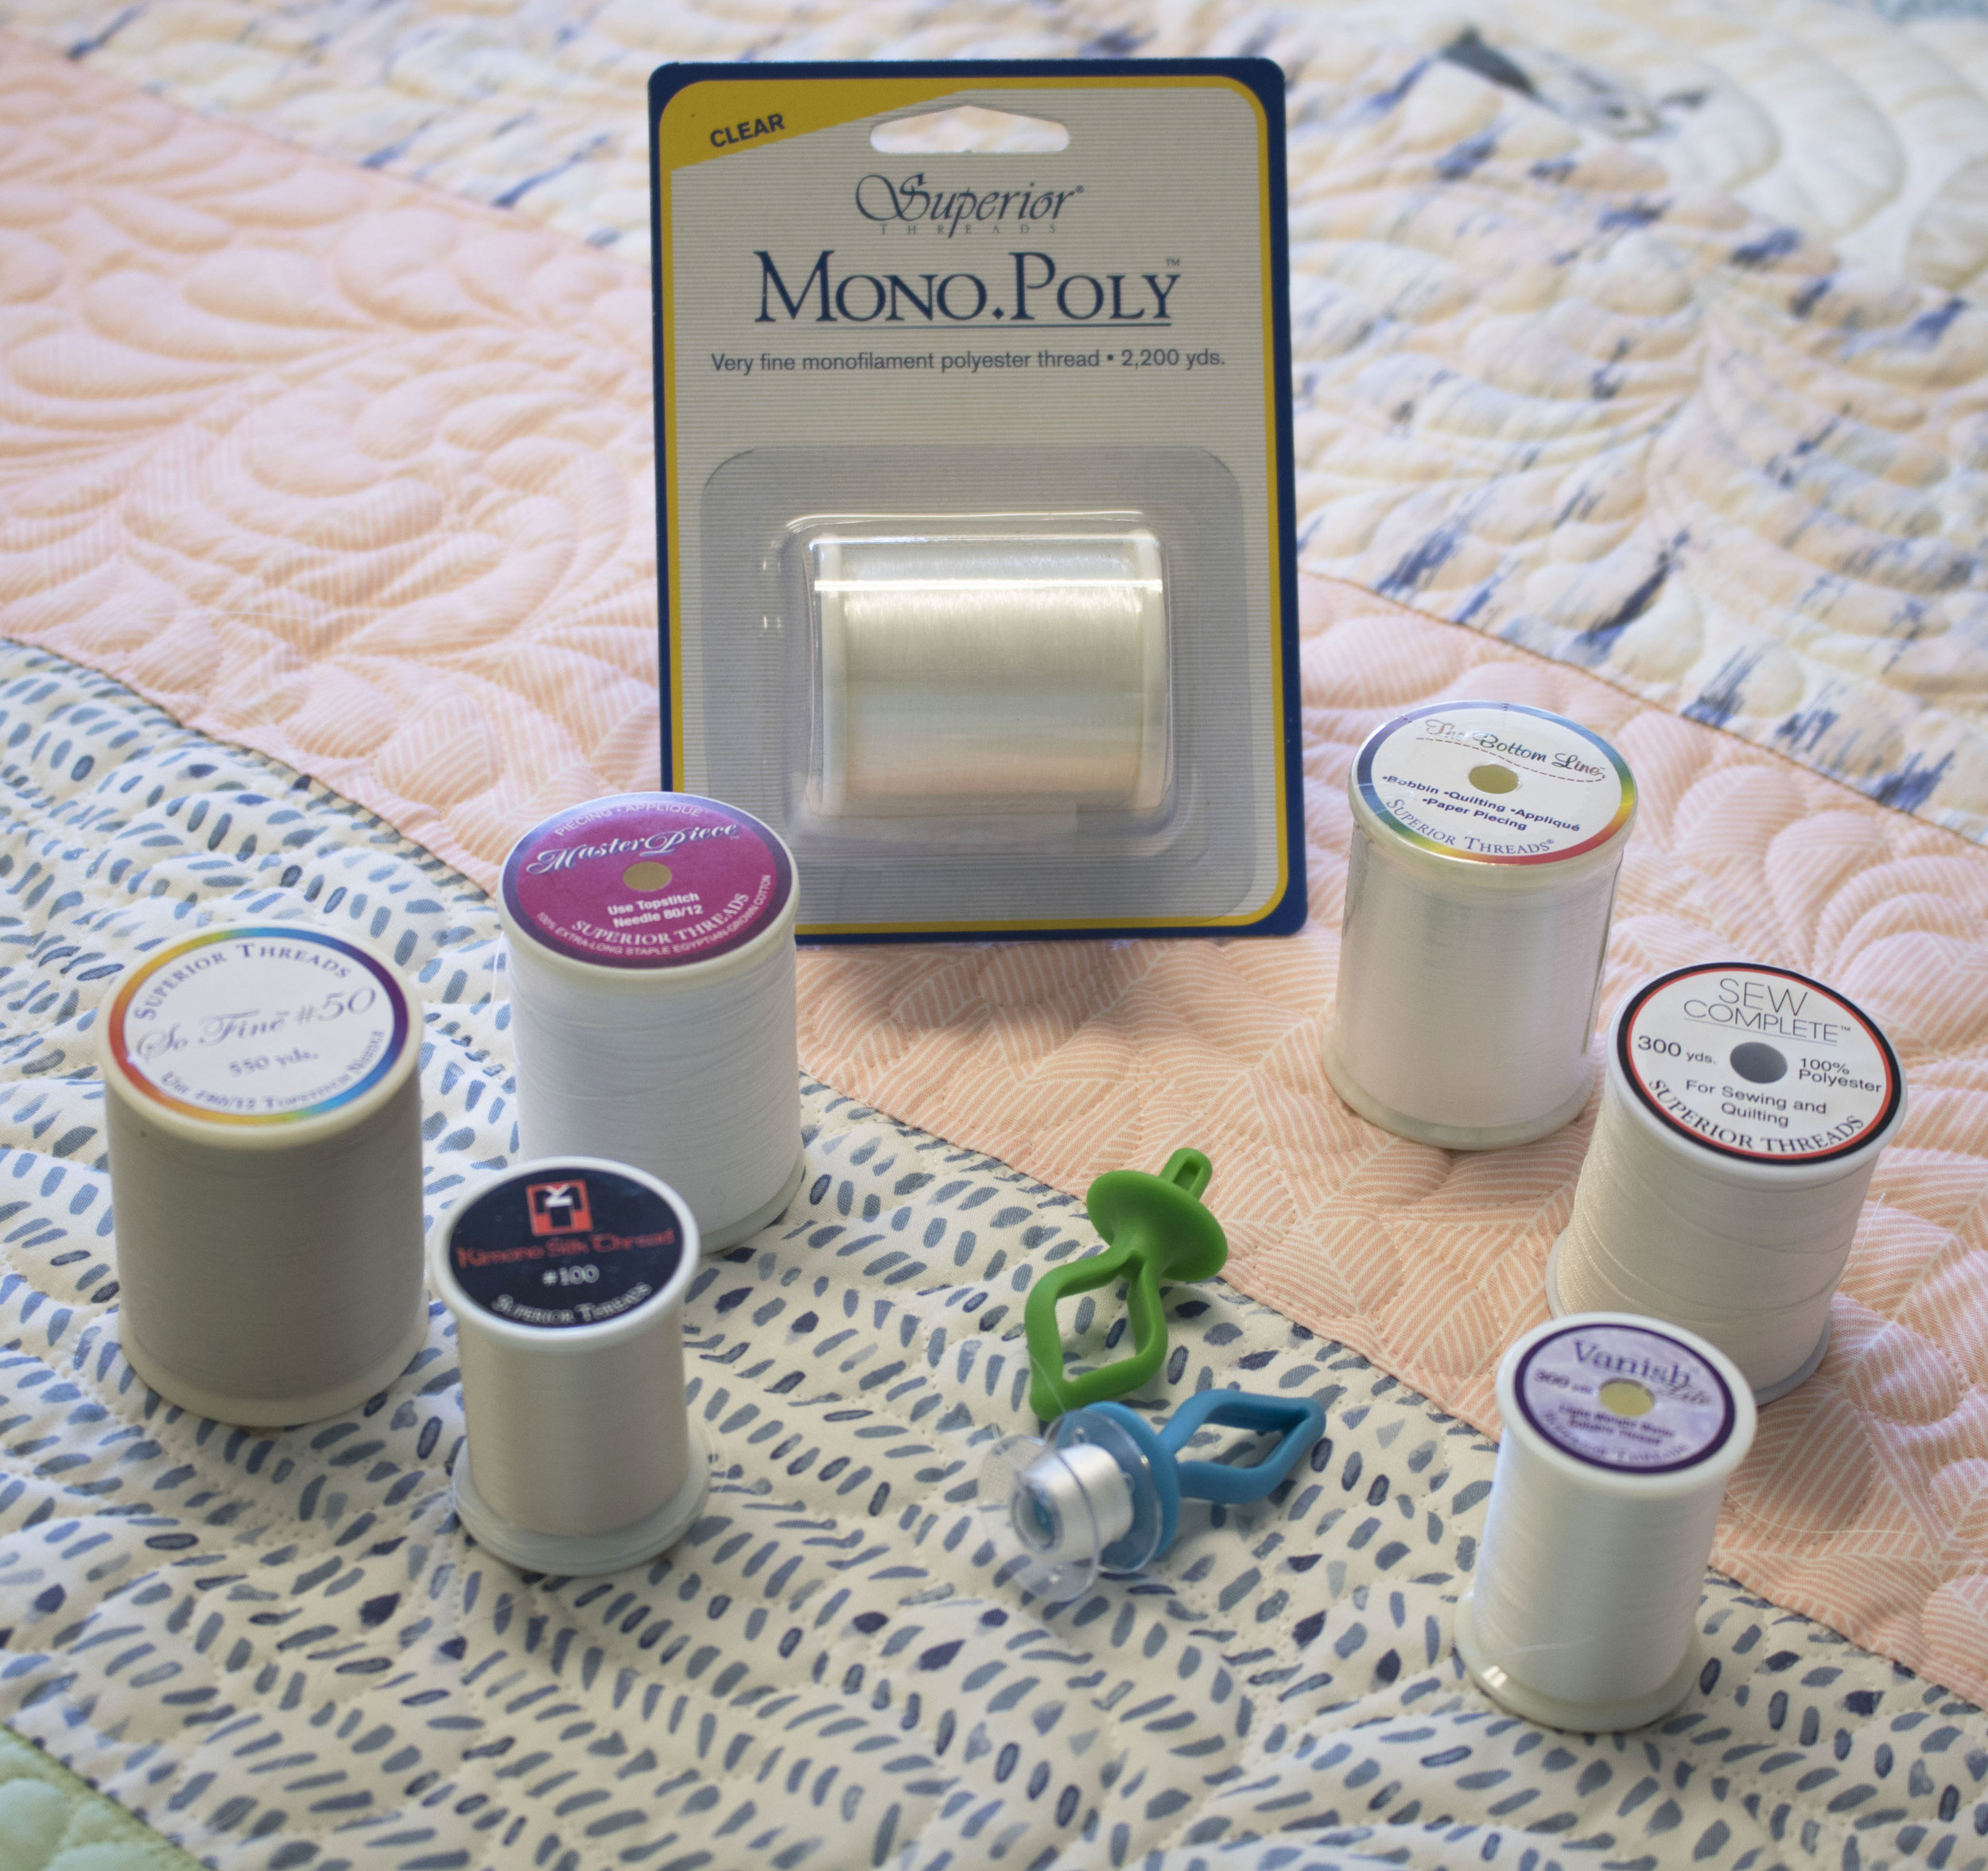
I don’t know about you, but I love thread almost as much as I love fabric! One day I’ll share my sewing studio with you…lots of thread collections in there! I do produce my videos in my sewing studio, but you only see one side - behind the camera are drawers and cabinets filled with threads of all kinds! As a former quilt shop owner, I am familiar with every thread company. There are very good companies out there (and a few ‘below standard’ companies), but one of my favorites is Superior Threads. This company has been around for a long time, providing specialty threads for quilters and sewers for all purposes. Today we focus on the 7 threads in your Maxie Mail box, with a value of $49.95! I think you’ll find some new favorites among them, as well as a couple of surprise uses!
Brew your tea (maybe toss in some ice), watch the 10 minute video and get back outside!

What’s inside your box?
Brochure and Thread Reference Chart - Be sure to save this resource for needle sizes and suggested uses.
Masterpiece by Alex Anderson, well-known in the quilting industry for her educational shows (The Quilt Show) and sewing and quilting products. This wonderful thread is developed from Egyptian-grown, extra-long staple cotton and produced in a way that yields extremely low lint.
So Fine! by John Flynn, developer of the Flynn Frame System and famous for his educational workshops. This is my go-to quilting thread! Problem free, it stitches beautifully in both long arm and home machines.
Monopoly - My #1 quilting thread! I love it for so many reasons! Check out your video for tips and samples of quilting to see how great it is for stitching in the ditch and enhancing your quilting designs! Note: I never use this thread in my bobbin!
Kimono Silk - 100 weight and 100% silk, this luxurious thread will spoil you fast! You’ll love it for hand sewing binding or appliqué and for machine quilting (especially micro quilting!)
The Bottom Line by Libby Lehman, known for her machine work with decorative threads on quilts. She needed a bobbin thread that would work with a variety of top threads, and Superior Threads saved the day with this thread! I use it on all my quilting projects, regardless of the top thread used. It’s fine, lint and trouble free!
Sew Complete: 100% polyester and strong for use when sewing bags, clothing, home decor (pillows and pillow cases) and applying zippers or pockets. Cotton threads fray easier and can break with constant wear and use, but polyester holds up when we need that extra strength.
Vanish Lite: This is my bit of fun-ness for you! I use Vanish Lite for basting quilts and any other time I know I will be removing stitching. Watch the video to see just how easily removed this time saver is. And…no more painful pin basting!
No video password needed. Happy Sewing! Blessings, Maxie
June 2019 - Woven Stripes Quilt
Hello, there! Welcome to June’s Maxie Mail Content! Welcome to our new subscribers! We had a record number of new members for this month, and I am so glad to have you with us! Before we dive in, I’d like to take a second to ask you to glance at your email address inside your account and make sure it’s correct. I send out an email prior to shipping and sometimes it contains pertinent news for you regarding your project, so it’s important for that info to be correct. Your tracking number is also emailed to you on the day the label is created (usually around the 23rd, and then we need a day or two to affix them to the packages). Your email address will never be shared or sold, but kept solely for communication from Maxie Makes.
If you received last month’s Cool Tools box, pull out your Fussy Cut and Square-up Ruler set and your Strip Stick because they will help you with accuracy while trimming and pressing. (If you don’t have those products, I gotcha covered in the video.)
Do you love stripe fabric? Maybe so, when you can use it as binding, right? It can be hard to use in a quilt because the direction of the finished patch may not be as planned, causing some disharmony in your desired look. That ever happen to you? If so, you probably avoid stripes when choosing fabrics for the inside of your quilt.
This month has been in the works for quite some time, as I mused over a technique I learned from a well-known quilter/teacher/author, Anita Grossman Solomon. This technique works with stripe fabrics, making them center stage. As usual, I played in Electric Quilt to see what types of variants could be applied to her technique and when a surprise appeared I knew I had to share! While our quilt uses two identical stripes in two colors, I also played with the design using only one color. See those here and here.
Anita’s technique creates a bias edge around the outside edge of the quilt block. We all know that this can cause major problems in a quilt (because when fabric is not cut straight ‘on grain’ it stretches) unless specific things are done to make sure the edges remain stable. So, Anita helped develop a product that stabilizes the cut edges so that no stretching is possible. You’ll find this product, Make it Simpler® Fusible Stabilizer inside your box! It’s so soft that you won’t know it’s there, and I’ll show you exactly how to use it in the video below. And…by the way, this method is great for slicing and dicing other types of quilt blocks…let your creative juices flow!
Anita’s original instructions are on the back side of the product card inside your box, so be sure to keep that for another project, but for this project you will need to follow my pattern and video.
You can find Anita Grossman Solomon on her website makeitsimpler.com, or teaching several quilting classes at www.mybluprint.com. She has a wealth of quilting knowledge and you will love her mild, easy teaching manner. (Search with her name in Bluprint’s search-bar.)

What’s inside your box?
Legendary Art Gallery Fabrics by Pat Bravo
Gutterman thread
Make it Simpler® Fusible Interfacing
Olfa Rotary Cutting Blade
Pattern
What will you learn?
A new way to work with stripe fabrics! See the links above to view variations of this technique.
Stabilizing bias edges in a block.
Note: I’ve removed the password from this video in order that Anita may share, so click and play!
Thank you for your subscription to Maxie Mail!
Blessings, Maxie
May 2019 - Cool Tools!
Note: Please be sure to view this month’s video as I share part of my vision for the future of Maxie Mail…with more to come later!

Hello! It’s here! It’s ‘Cool Tools’ month! Inside this month’s box you’ll find some soon-to-be favorites for your supply of necessary tools! I’ve designed a 6-piece set of ‘Fussy Cut and Square-up’ cutting templates to be used in a wide variety of quilting patterns. Many quilts include either half-square triangles, quarter square triangles, flying geese or fussy-cut patches. In my years of teaching quilting classes, I found the one thing that frustrates quilters more than any other is loosing a sharp point on a star’s tip or a flying geese block, etc. Surprisingly, the problem usually comes from the trimming step, and not the sewing! ‘Fussy Cut and Square-up’ rulers to the rescue! Watch my video demonstrations for each unit, as well as the obvious fussy-cutting benefits!
And…the neon yellow reflects light down to your fabric to make cutting easier than with clear rulers! Be sure to save your box insert this month for the half-square triangle and flying geese instructions on the back side!
Next up: the ‘Strip Stick’! I mentioned in last month’s video that I was hoping to be able to include this with our Cool Tools, and it did work in your favor! Using this pressing tool always produces professional results and keeps all your seam allowances where they belong!
Lastly, ‘Carol’s Box Corners Cutting Template’ made by Almost Heaven Woodcraft (also the maker of last month’s Stitcher’s Friend) makes boxing bag corners effortless! I suggest tying a ribbon loop through the hang hole to help keep it handy. In the video, I demo how to use this tool on Pinky’s tote bag, so be sure to watch! Pinky’s tote bag is created with the Maltese die-cut fusible pattern from The Whole Country Caboodle (I misspoke the name in the video).
Need more stuff?
Thank you for your subscription! Next month, get ready to use your new ‘Fussy Cut and Square-up’ ruler set!
Blessings,
Maxie
April 2019 - Drunkard’s Wheel Quilt
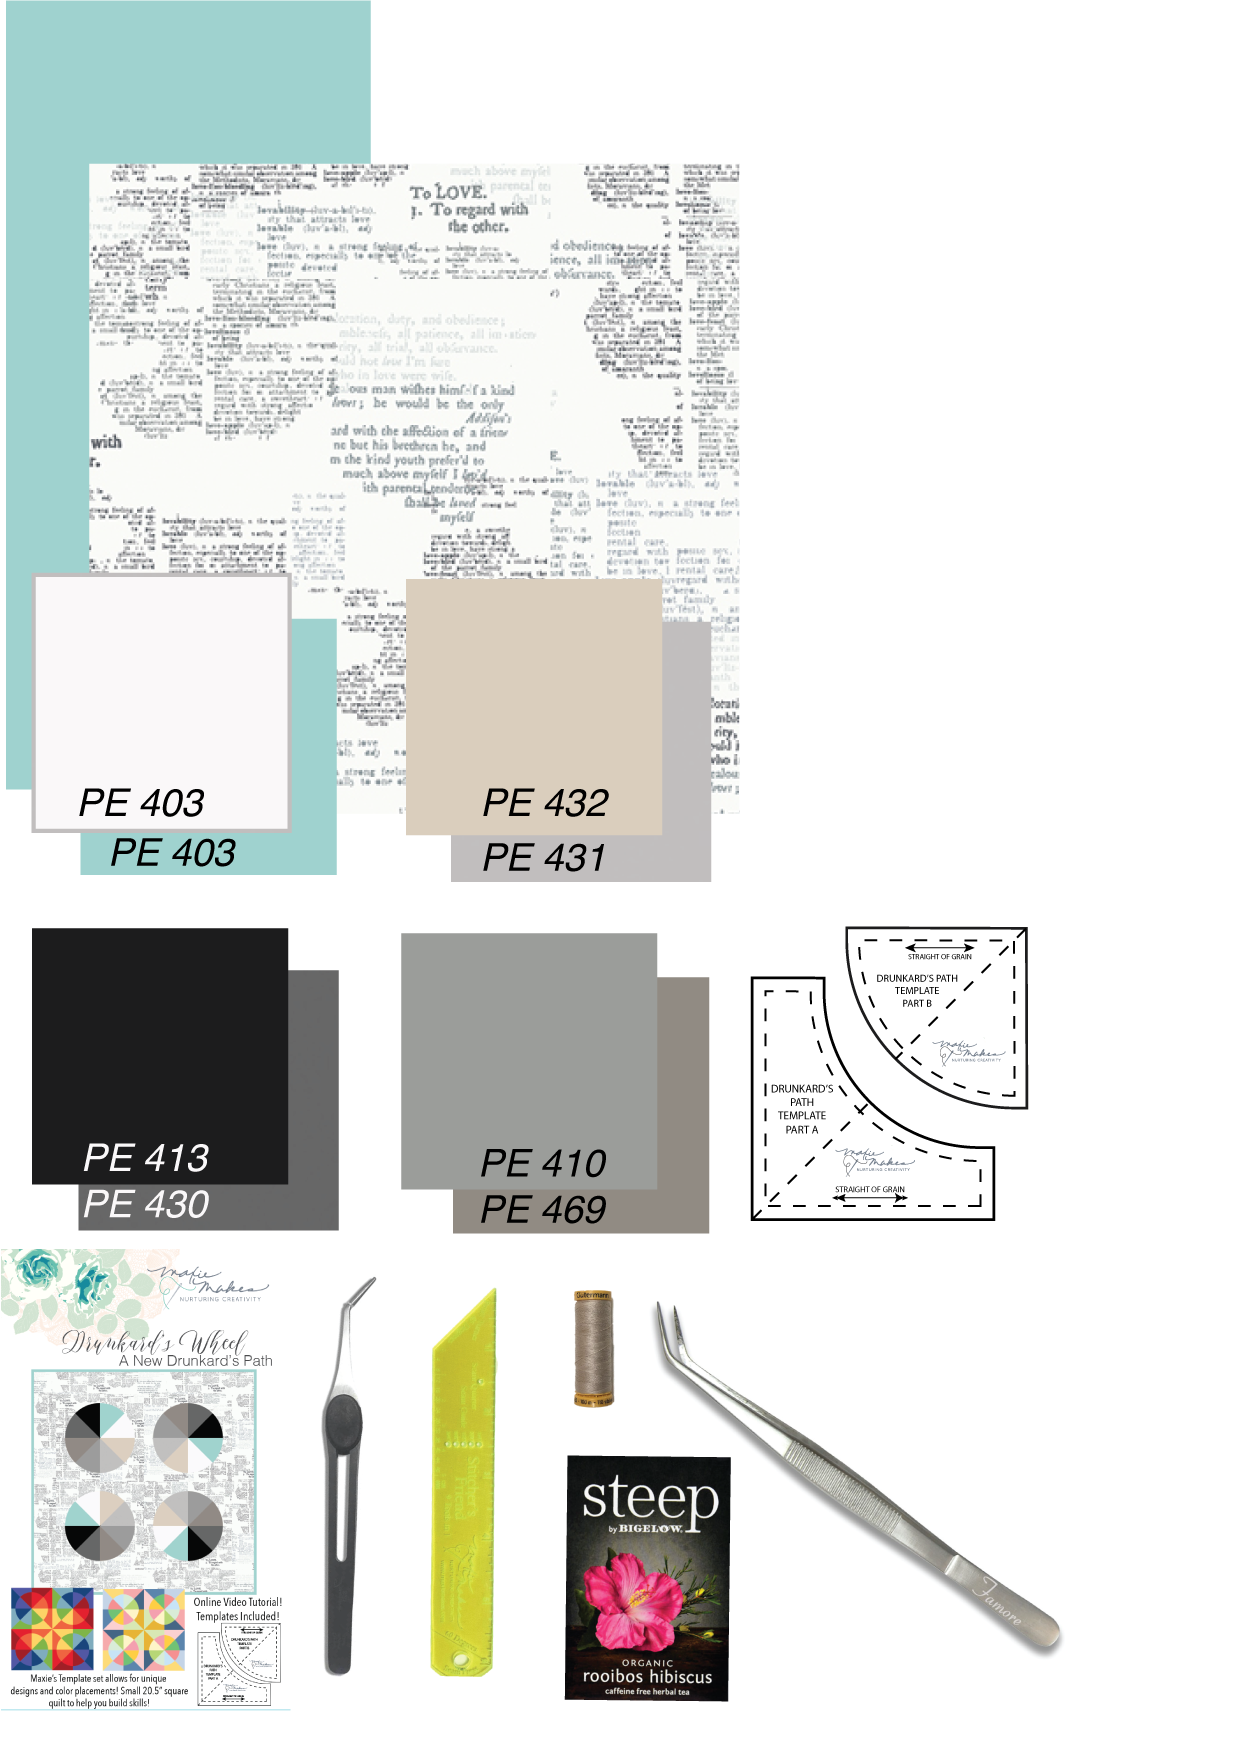
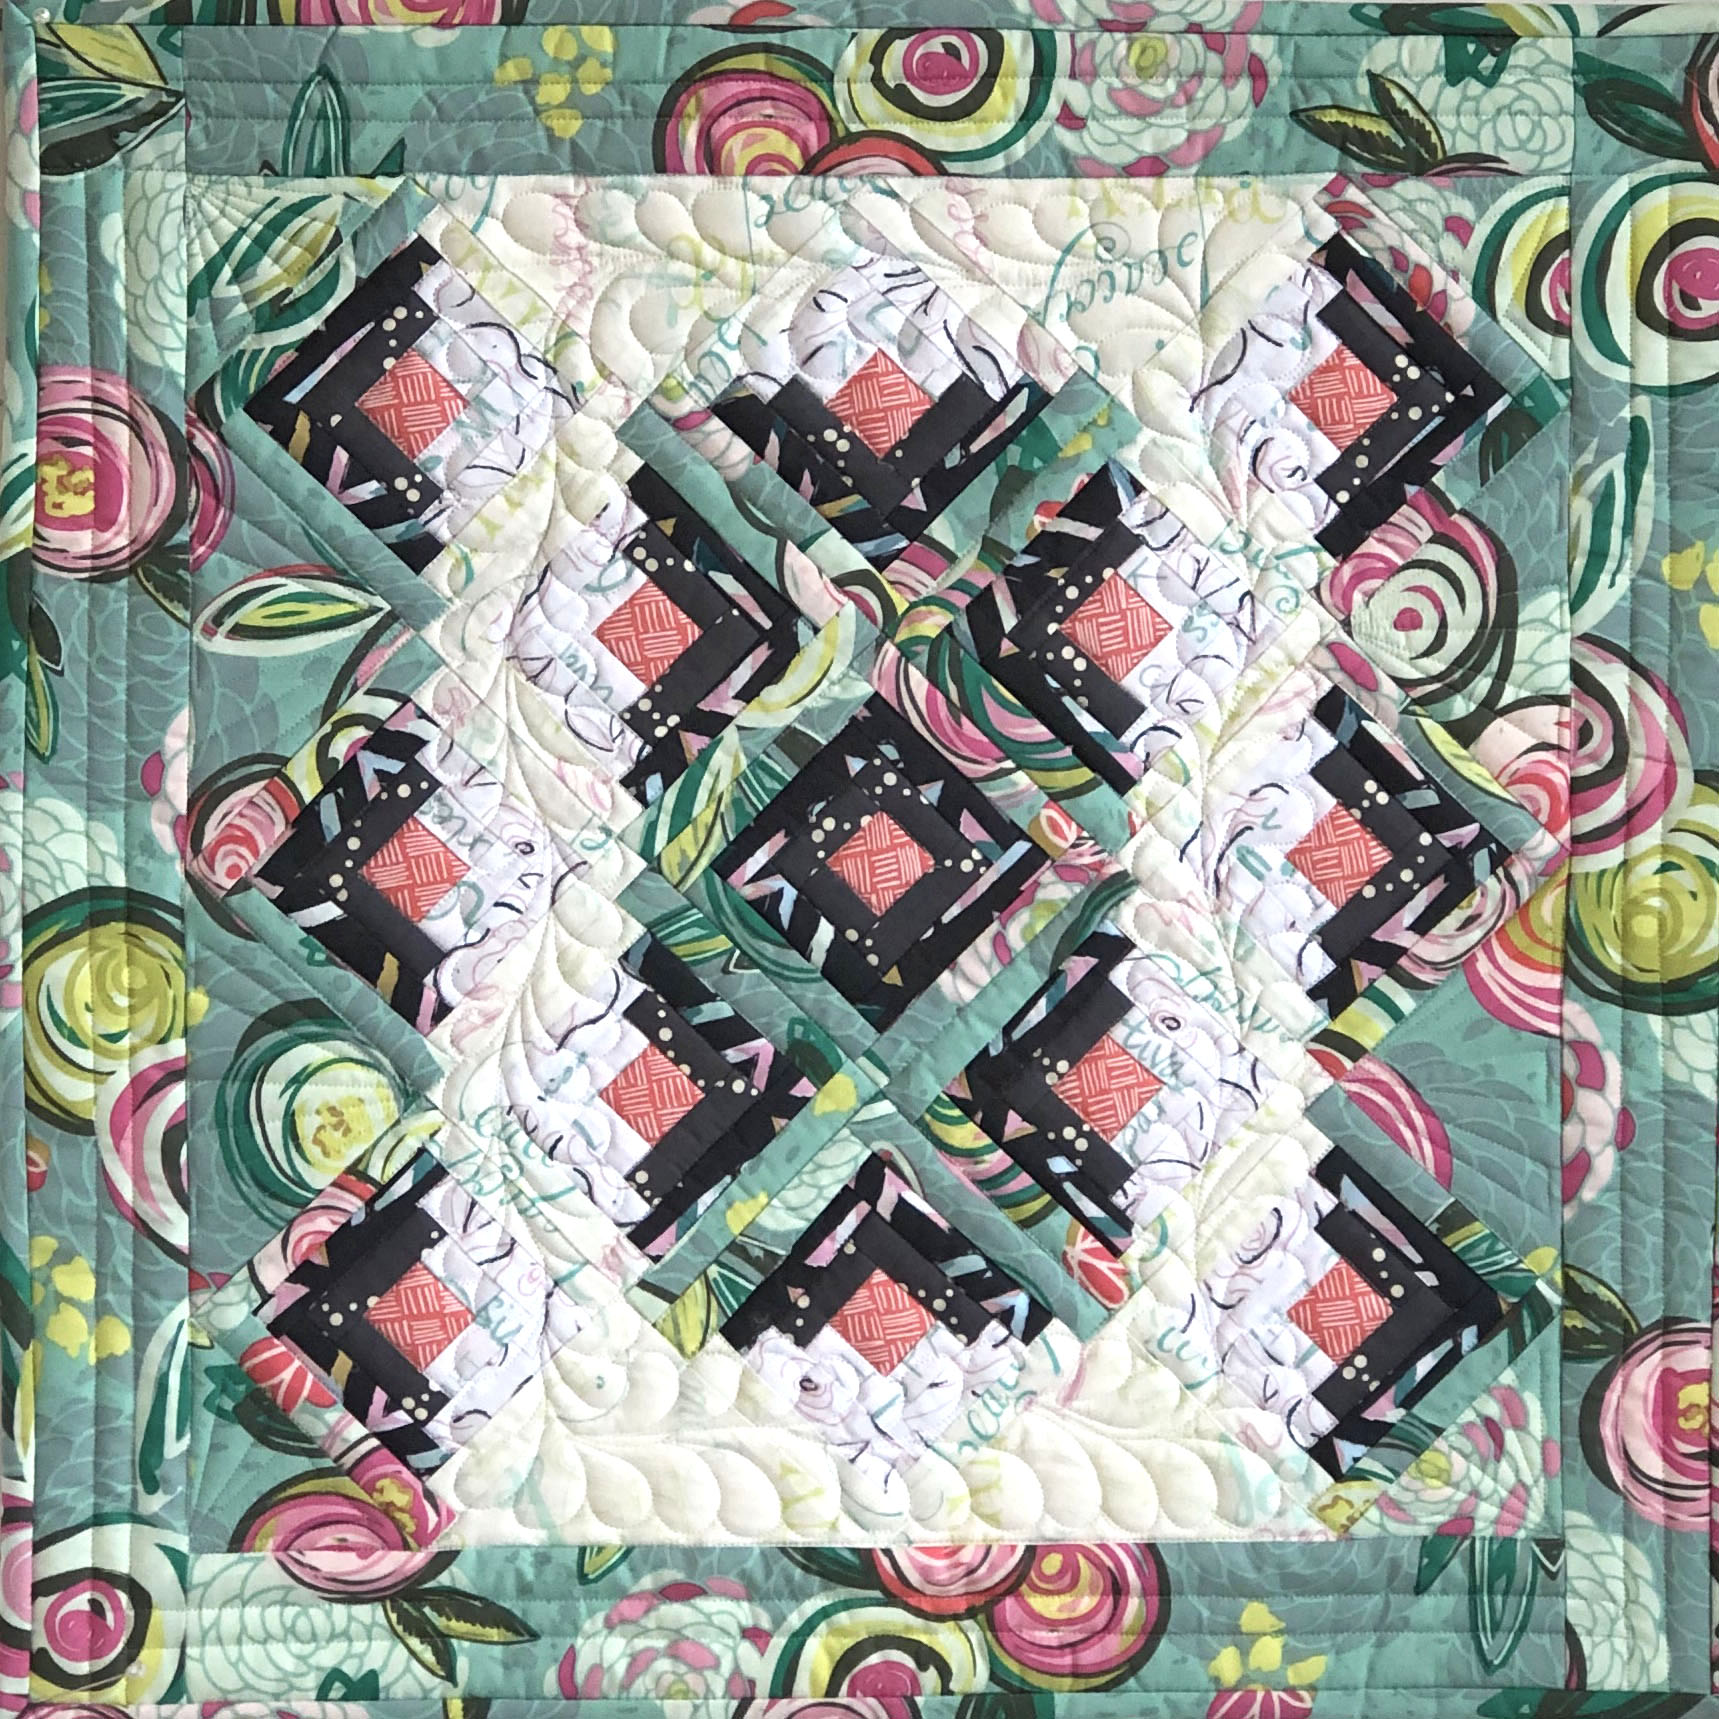
Hello! Welcome to your April Maxie Mail Content! One of my favorite things to do is to work with an old favorite quilt design and give it a modern update. At first glance you might not recognize the traditional Drunkard's Path design in our new project, but a close examination reveals that these patches are pieced before cutting, disguising the familiar pattern. I designed a new Drunkard’s Path Cutting Template Set for you, with divided seam guide lines through the diagonal center, making it perfect for working with Half Square Triangles (HSTs)! I’ll show you how to make those HSTs and tell you the formula for creating any size Half Square Triangle Unit with a fudge factor. For this quilt, we will be cutting the convex side of the ruler from half square triangles and the concave side from yardage. (The concave side may also be pieced before cutting, however, and I’ll show you several design options with that in mind.) I’ll meet you at my sewing machine to walk you through each step of this pin-less, painless method of piecing curves! Sewing with a scant 1/4” seam allowance is crucial to success (as in so many quilting projects!), so I’ve included a 1/4” seam guide inside your box, and I’ll show you how to set that up at your sewing machine!
And…do you avoid working with directional fabrics for fear of upside-down elements or waste? Be sure to view my video and you’ll be able to confidently work with any directional fabrics and always come out on top! This month we are tackling so many scary quilty things! Let’s get started!
What’s inside your Box?
Everything you need to complete your top, plus the binding fabric! Fabrics for making HSTs are precut for you! All fabrics are Art Gallery Fabrics 100% Pima Cotton!
Maxie’s new Drunkard’s Path Cutting Template Set.
Famorè Serger Tweezers (style may vary, but both, shown at left, are made by Famorè).
Almost Heaven Woodcraft’s “Stitcher’s Friend 9 in 1 Tool”. (It’s a great point-turner, and more!)
Gutermann Cotton Thread, light grey.
Drunkard’s Wheel Pattern.
What will you learn?
Curved piecing without pinning.
Working successfully with directional fabrics.
How to set a perfect ‘scant 1/4” seam allowance’.
Half-Square Triangles with a fudge factor (in any size).
Bonus quilt binding video here.
Download your Drunkard’s Wheel Coloring Sheet here!
View Maxie’s Quilt Binding Video Tutorial here!
Want more of that beautiful text print, Love Meaning? I had one extra bolt, so I placed it on the shopping page for you, along with the soft teal!
The first video, below, is your box review (no password), and the second is your full tutorial. You’ll find the video password on your pattern inside, top left. Be sure to download your coloring sheet and design idea file (above)!
April 2019 Maxie Mail Box Content Review
Drunkard’s Wheel Video Tutorail
(Password located inside pattern, top left.)

Click the block image below to download your block layout!

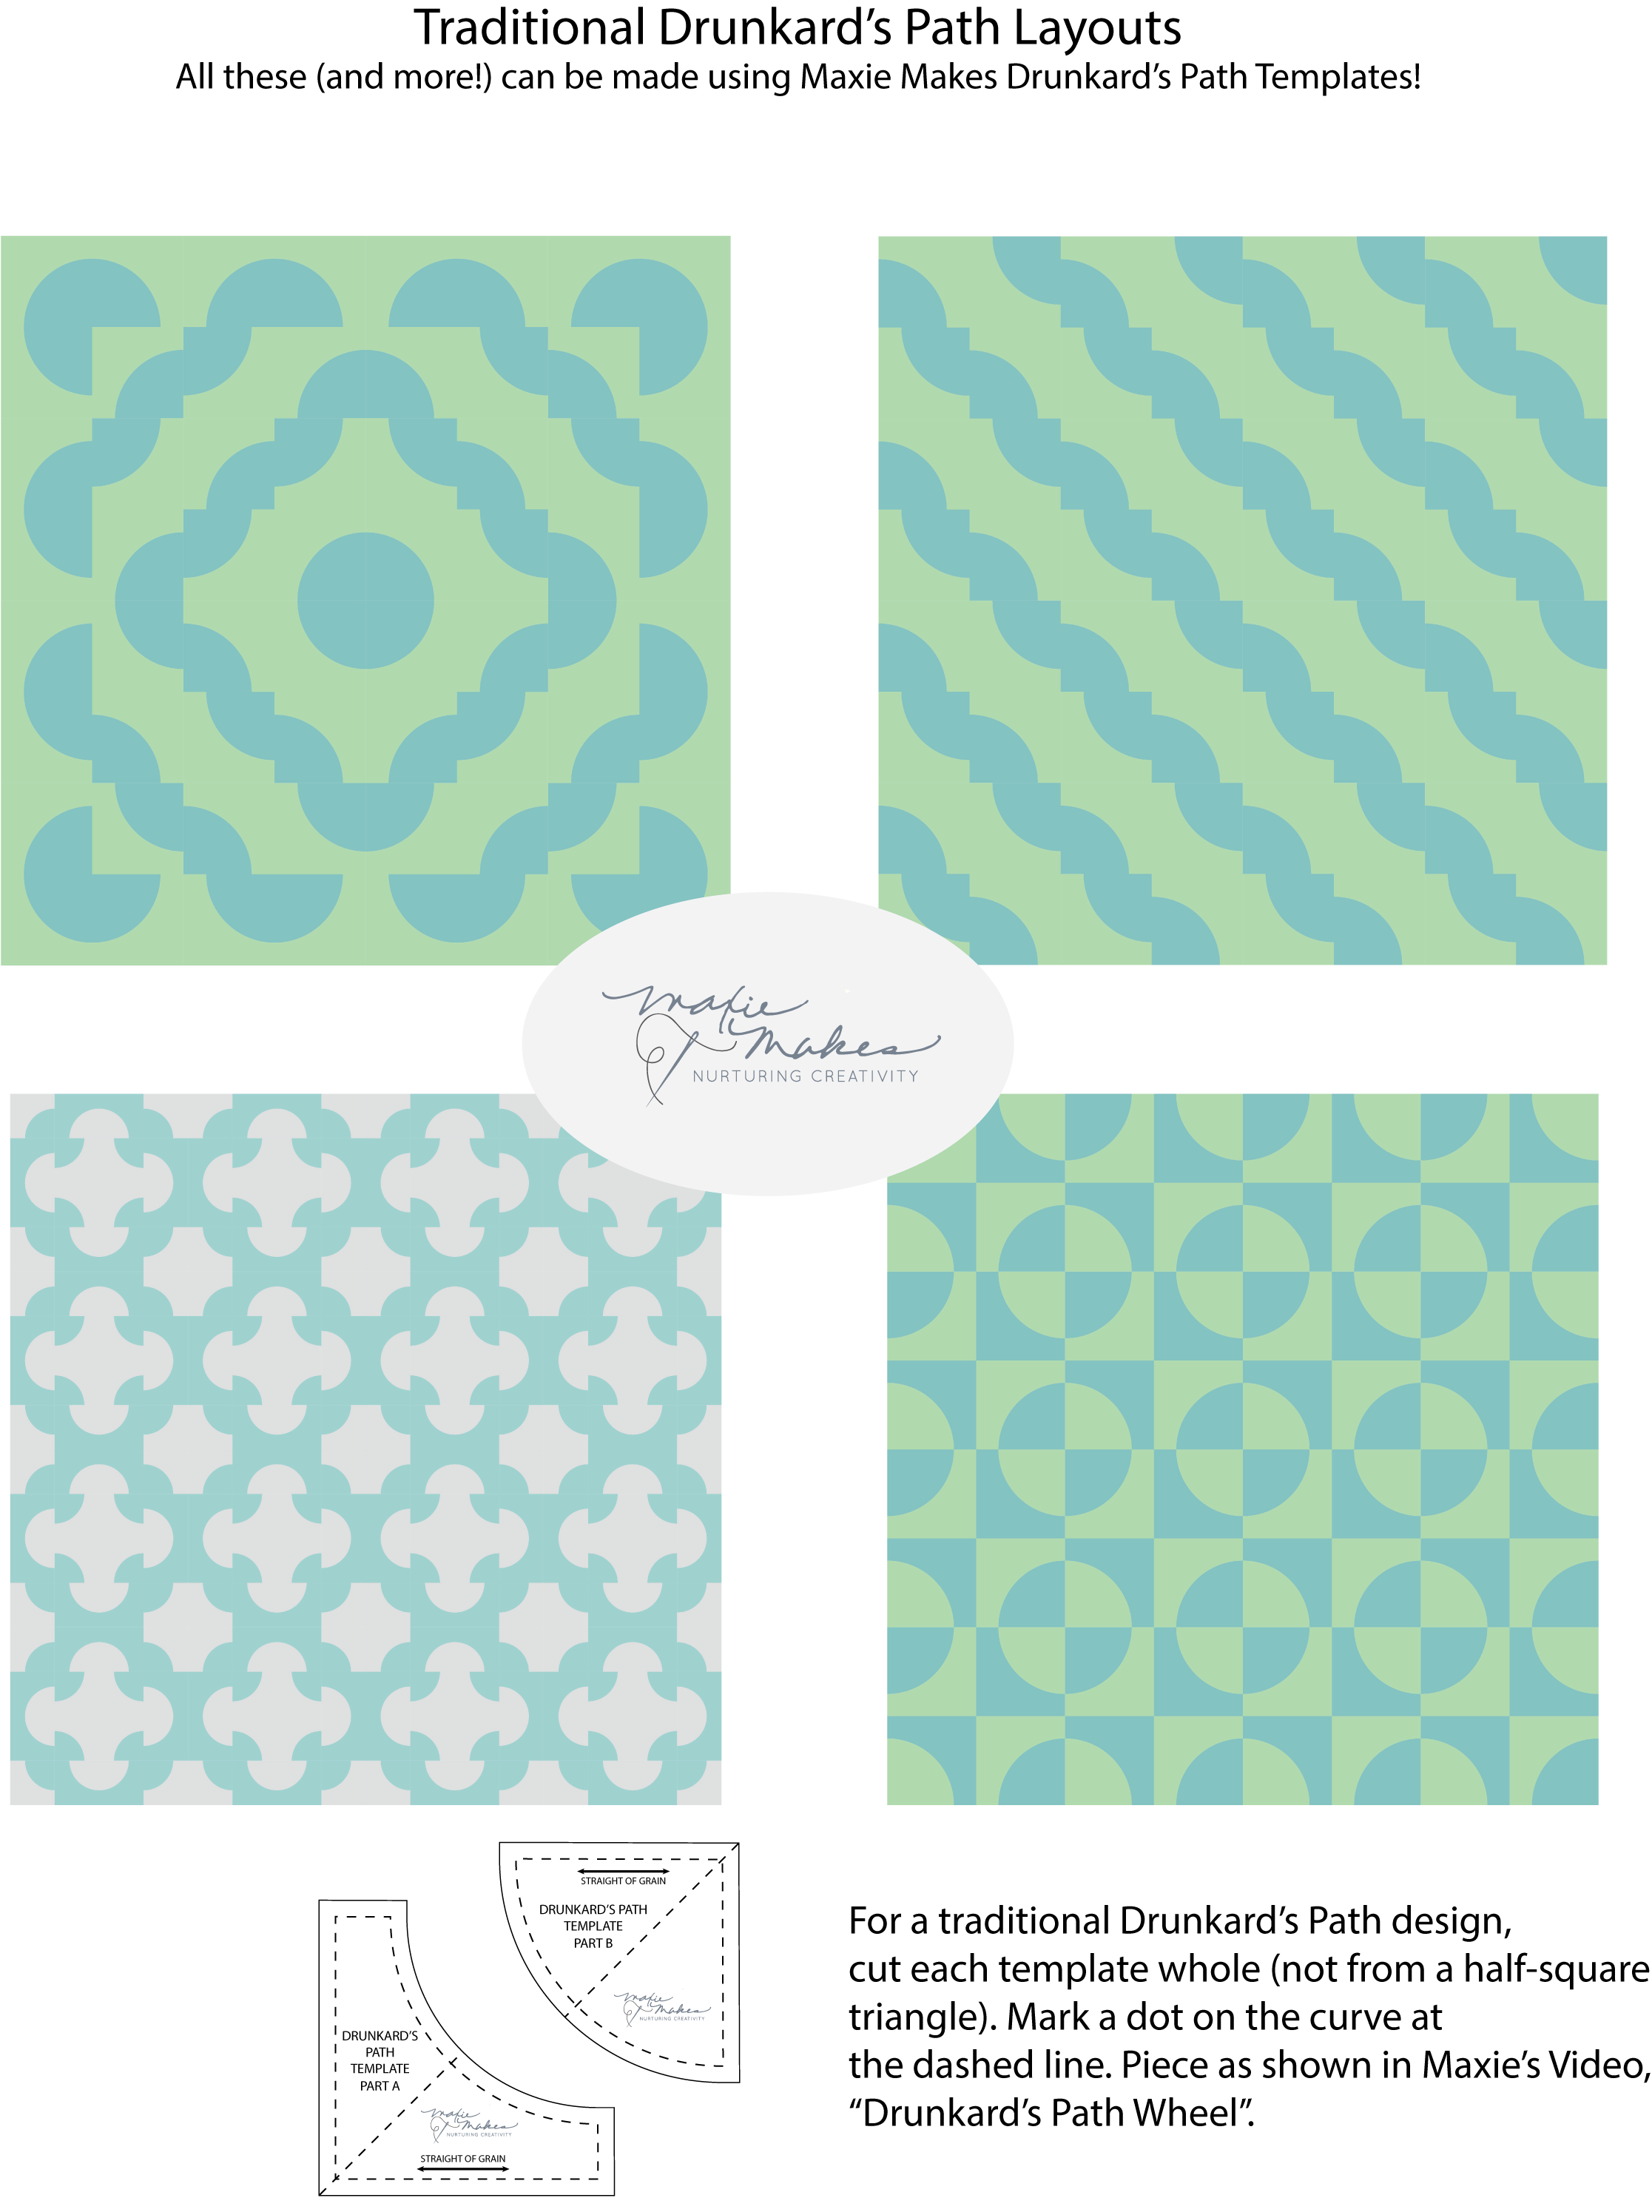
Thank you for sewing with me! There are so many design options with your new Drunkard’s Path Cutting Templates. You can download the Traditional Idea Sheet (above, right) by clicking on it. I’d love to see what you create, so please be sure to share your makes with me!
“Cool Tools” is coming your way next month with my favorite quilting and sewing things!
Blessings, Maxie
March 2019 - the Twiggy Tumbler Template and the
Lava Lamps Pillow or Quilt
Hello! Welcome to your March content! I’m pretty excited to bring you this month’s project with another new acrylic cutting template, “Twiggy Tumbler”, made just for you! We’ll be working on a quilt design that you can make into a pillow or a quilt. (Enough fabric is included to make an envelope style pillow back.) Like last month’s project, this is a one-patch quilt, so there is no block piecing; simply cut the shapes and start sewing! But, unlike last month’s project, this quilt has no ‘Y’ seams; simply sewn straight seams! (I’m getting good at those tongue twisters…Twiggy Tumbler Template twisted my tongue too many times in today’s tutorial!)


I had so much fun working with this little tumbler shape and was very surprised at its versatile design capabilities! I settled on this pillow or quilt for our project, with four different layout options. The main option, and the one demonstrated in the video is “Lava Lamps”, hence the pattern name. But just look at these other, larger versions that use the very same layout! (See image, above.) I worked these designs (and others) in Electric Quilt, so if you have that software and would like my layout instructions, click here! If not, click here for a coloring sheet! (Or click the image to download.) Print as many as you like for your personal use, and please share your creations with me!

What’s inside your box?
Art Gallery Fabrics 100% Pima Cotton for pillow top and envelope pillow back. Fabrics are by Bari J, Sew Caroline, Sharon Holland and AGF Studio.
For quilting your project: Moda Muslin and Warm & Plush batting from the Warm Company.
The Twiggy Tumbler acrylic cutting template.
True Grips Non-slip Adhesive Rings to keep your template steady!
Gutermann Cotton Thread
Pattern
Tea
What will you learn?
How to cut and sew tumbler shapes efficiently and accurately.
How to measure and cut quilt borders - the easy way!
Let’s get started!
You’ll notice a little different format for our videos this month. We made two videos, one as a box content review, and the second as a separate tutorial for the specific project. You’ll want to watch both, as helpful instructions are included in each. I felt that it would help streamline your time to be able to go directly to the instructional video when you are ready to sew. This would also allow me to share the content video in a public manner with those curious about Maxie Mail, without disclosing the tutorial. No password is needed for the first video. The password for the second video is printed on your pattern, front left, top paragraph.
Thank you for subscribing to Maxie Mail! I love sewing with you each month and enjoy the connections we’ve made from all over the world!
Blessings, Maxie
Videos
Twiggy Tumbler Tutorial - Password is found inside your pattern, front left, top paragraph.

February 2019 - The HoneyPot Celebration Table Runner
Hello, everyone! Welcome to your February content! I have to thank you all that participated in our ‘February Friends’ event! You blew me away with your kind referrals, and many ‘thank you’ surprises went out in boxes this past week. I’ve come to feel on a friendship basis with many of you and I deeply appreciate every single member! Our boxes are also shipping to many countries outside the USA, and the connections I feel, both home and abroad, are very meaningful and rewarding.

If you’ve ever shied away from the ‘Y’ seam, this month’s project may have you shaking in your boots! But just be patient, brew that tea and watch both of the short videos below while you are sipping. I think you’ll find sewing hexagons not only easy, but very fast and fun! We are making The Honeypot Table Runner, a spin-off of a project my daughter, Bonnie Christine, and I designed for Art Gallery Fabrics. That pattern is a free download, (see below) and since I am including my Honeypot Acrylic Template in your box, I have a feeling you’ll soon be busy as a bee!

With no hexagons to cut and no blocks to piece you’ll get straight to the fun! With fabrics so perfect for spring & summer, or birthdays, babies, weddings and more, you’ll be sure to find it on your table often!
What’s in your box:
36 pre-cut Hexagons in Art Gallery Fabrics’ Reverie Fusion line, including Bonnie Christine and Sew Caroline designs.
Border fabric
Binding fabric
Maxie’s Honeypot Hexagon Acrylic Template
Gutermann 100% cotton Thread
Pattern
What you’ll learn: In this month’s video I share how to perfectly sew a ‘Y’ seam so that it lies flat and smooth. You’ll learn how to spin your seams on the back side of the quilt top to further ensure flat seam allowances. You’ll also learn about hexagon grain lines and which side to sew first. Let’s get started!
Please watch the videos in order below, because I share important information about the contents of your box and sewing tips in the first one. The second video will teach you my technique for sewing hexagons together for a perfect, flat ‘Y’ seams!
Want the free pattern that Bonnie and I designed for the larger Honeypot Quilt hanging behind me in the video? Honeypot Quilt
And…just in case you might be inclined to wish for a Honeypot Pre-cut Quilt Kit, you’ll find a couple of colorways here!
One more thing…need help with binding your quilt? Click here for my video tutorial.
Thank you for your subscription and for sewing with me! Blessings, Maxie
The Honeypot Table Runner - no password required.
Let’s Sew Hexagons! - No password needed.
January 2019 - The Island Cabin Quilt
Hello, everyone!
Before we get into our box project, I have some news to announce! February, which is the perfect month to share a little love with your friends, marks our 2nd Annual February Friends Month! Refer a friend to Maxie Mail, and when your friend subscribes, request that your name be placed in the ‘Referred By’ field and you’ll both find a surprise tucked in your February box! And…there’s no limit! You’ll receive a gift for every referral! Offer good through February 22, 2019. Thank you in advance for sharing your experiences with your friends!
This month’s project is filled with many skill building techniques! The video always has much more information beyond the written pattern, so be sure to watch.
What you’ll learn:
You’ll learn how to use the Log Cabin Trim Tool by Creative Grids© as you create your Island Cabins quilt. This tool is fool proof, and although the finished strips look small, you won’t be working with narrow cuts! All your strip cuts will be 1 1/2” wide, with the exception of border and binding.
Island Cabins is a bit unique for a log cabin setting, as the blocks are set ‘on point’. With tricky bias edges, you’ll learn how to correctly cut the required setting triangles for this type of layout, and I’ve created a downloadable Setting Triangle Chart for you to keep as a reference!
Quilt borders can serve the wonderful purpose of bringing our quilt tops back into ‘square’ and must be carefully cut. You’ll learn how I accurately fit borders with no measuring!
We’ll talk about fabric ‘values’ (color, shades, hues and how they work together).
Pressing, labeling your cuts and much more…in the video!
Let’s look at your box contents:

100% Pima Cotton Fabrics* by Art Gallery Fabrics for quilt top and binding, from designers Barij and Sew Caroline.
Creative Grids© Log Cabin Trim Tool
Gutermann cotton thread, color 1040
Island Cabins Pattern
A cup of tea!
*The pre-cut 10” squares need to be trimmed to 7” square, and the 5” squares need to be trimmed to 3 3/4” squares. Your pattern includes additional cutting instructions for all strips.
Brew that tea and let’s get started! Thank you for your subscription to Maxie Mail! I hope you enjoy sewing with me.
Blessings, Maxie
Island Cabins Video - Password can be found on the inside right side of your pattern (inside your box).

Click the image below to download your reference chart!

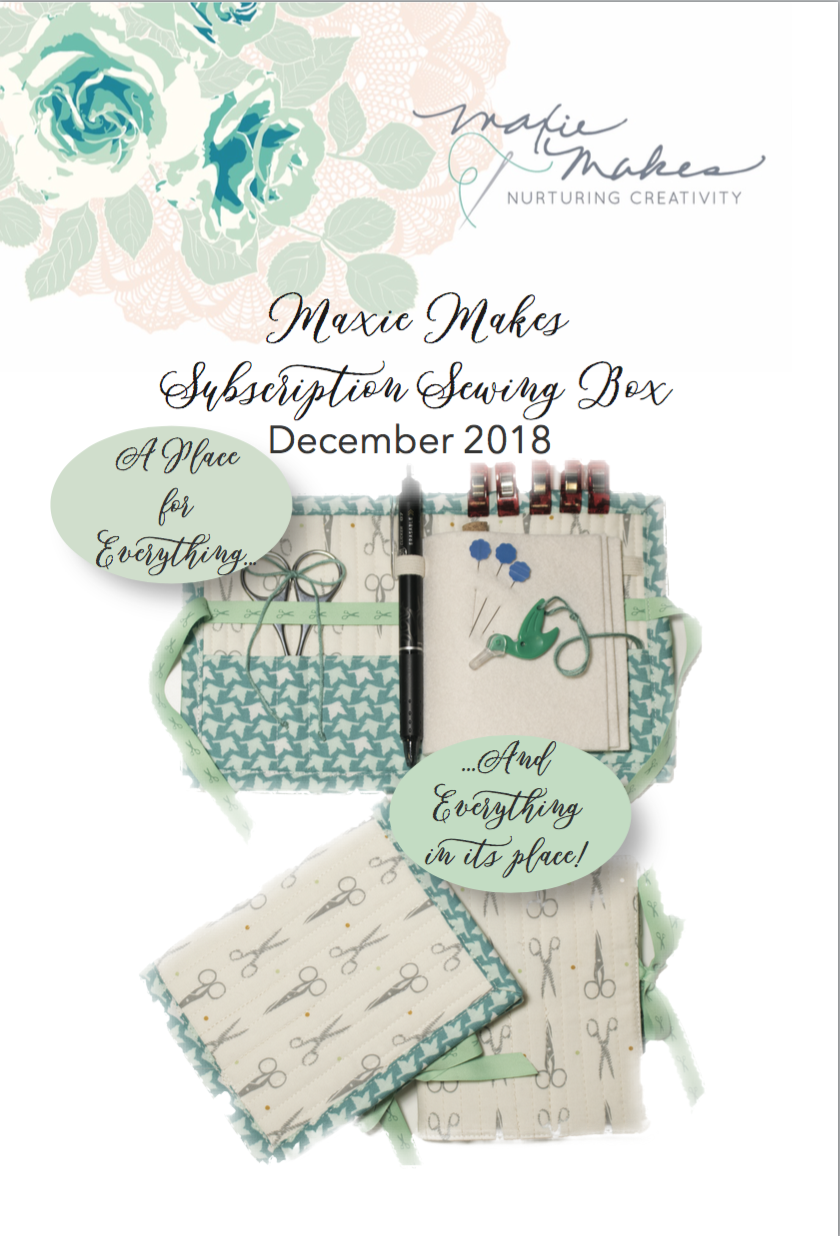
December 2018 - The So Much More Needlebook
I hope your Christmas was a merry one! With those Christmas festivities behind us I thought it might be a great time to de-stress with a sweet little project just for you! This month we are making a beautiful needlebook, but it’s so much more than that, with a bundle of storage possibilities for your portable sewing projects! Everything carried inside is kept safe and sound, with pockets, ties, ribbon and elastic, and the best part is that you can customize the inside for your favorite notions!
Easily completed in just an evening of sewing, be sure to watch the video to decide which version you’d like to make! (You’ll find the password on the back of the postcard inside your box.) I’ll walk you through all the cutting, layering and sewing in this month’s video tutorial. And, if you need help with binding just watch my binding tutorial, below the Needlebook video! It’s a great reference for all your quilting projects! (No password needed.)
Not only are you receiving all the fabrics and ribbons, elastics and ties, you also receive a beautiful pair of embroidery scissors and the sweetest Hummingbird Needle threader! Everything you need to complete your project is tucked inside your box, even the fusible batting, which was graciously supplied for you from Quilters Dream Batting! I love this particular batting because of the softness after fusing. It’s particularly applicable in this project because the lining can be fused in place so that there is no shifting when quilting, and if you choose to make the unbound version, the fusible batting will hold the finished lining in place and keep the book very stable. This batting would be a great choice for bags, pillows and more! Quilters Dream has also supplied a sample card for you.
Here’s what you get:
So Much More Needlebook Pattern by Maxie
Outer and lining fabric, by Pat Bravo for Art Gallery Fabrics
Pocket and binding fabric, by Bonnie Christine for Art Gallery Fabrics
Fusible Batting from Quilters Dream Batting
Decor Bond Fusible Interfacing
National Non-woven’s Woolfelt
Gutermann Cotton Thread
Embroidery Scissors
Dritz Fray Check
Dritz Hummingbird Needle Threader
Riley Blake Ribbon
Silk Yarn
Cotton Elastic
The So Much More Needlebook Video Tutorial (You’ll find the password on the card inside your box!)

I hope you’ll enjoy sewing with me and creating your own personalized needlebook! Before starting, gather your favorite notions so that you can create customized places to tuck them inside, and be sure to post your photos on Instagram and Facebook! (#maxiemail and @maxiemakes)
I hope your new year is blessed beyond measure! Next month’s project brings you a traditional quilt block with an unusual setting, and a foolproof construction method! Thank you for your subscription to Maxie Mail!
Quilt Binding Tutorial - No Password Needed!
December 2018 - 7-Way Mobius Scarves!

This month’s sewing project is dedicated to my beloved Mother, who passed into heaven just yesterday. She instilled so much in me, including her love of fabrics and sewing. She was strong, tenderhearted, kind and loving, devoted to her family and to God. I’ll be thinking of her every time I step into my sewing room, or see a beautiful flower garden or attempt to make Thanksgiving dressing as good as hers. I loved her fiercely. This photo was taken of her at age 84, holding 1/2 of her portrait at 18 years old.

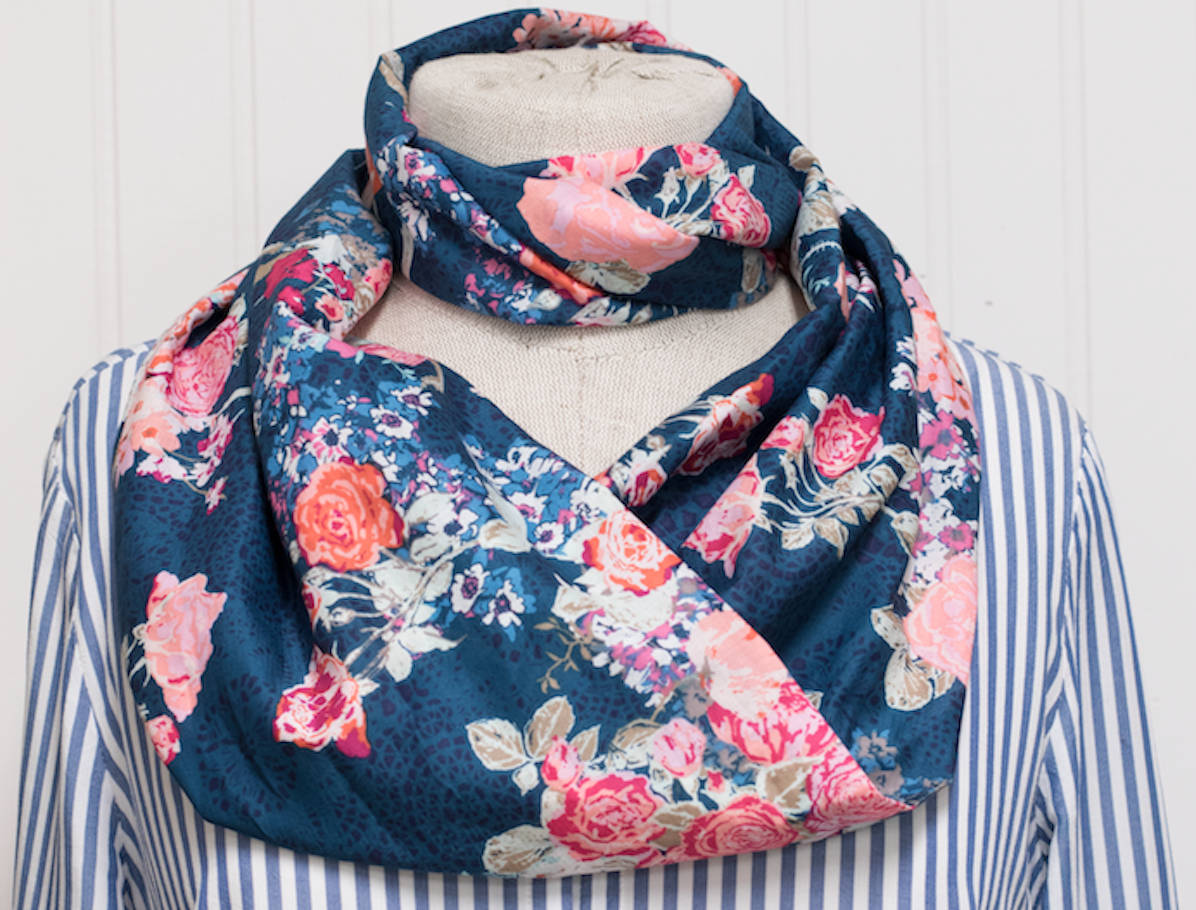
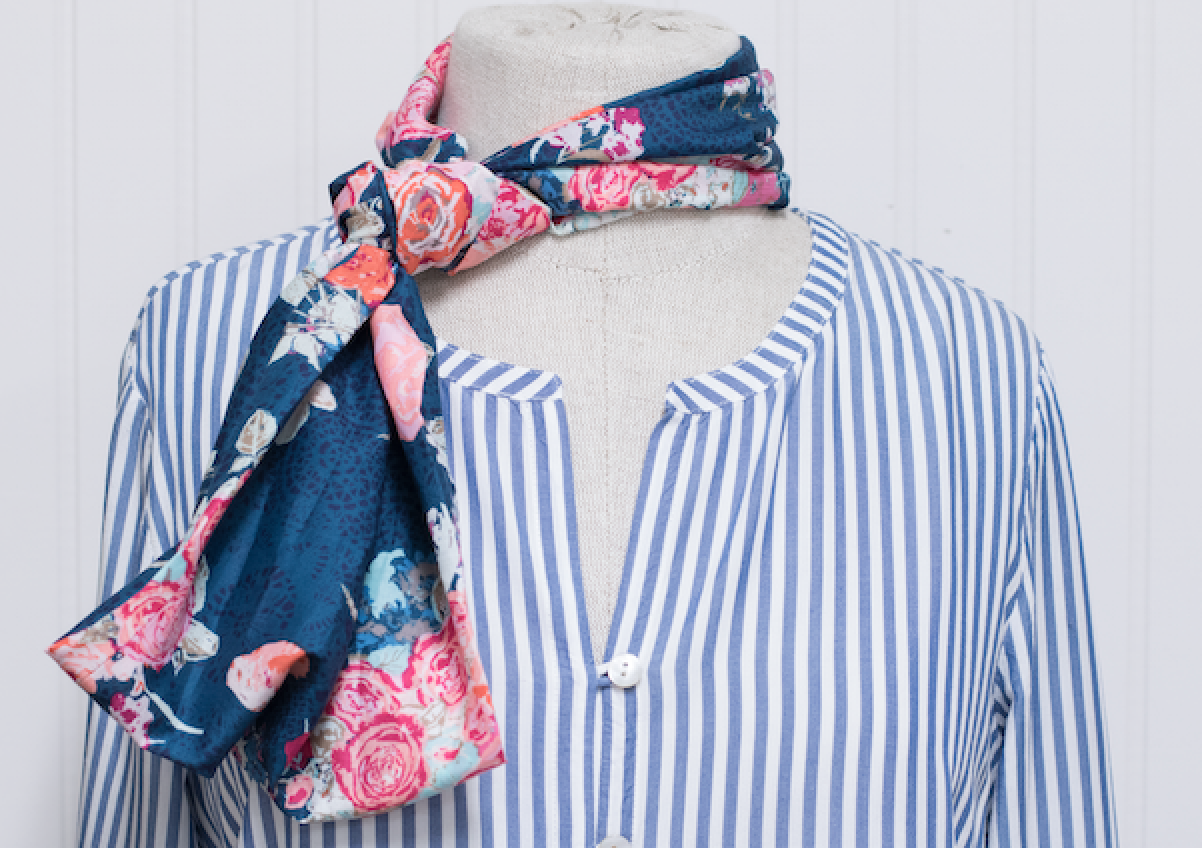
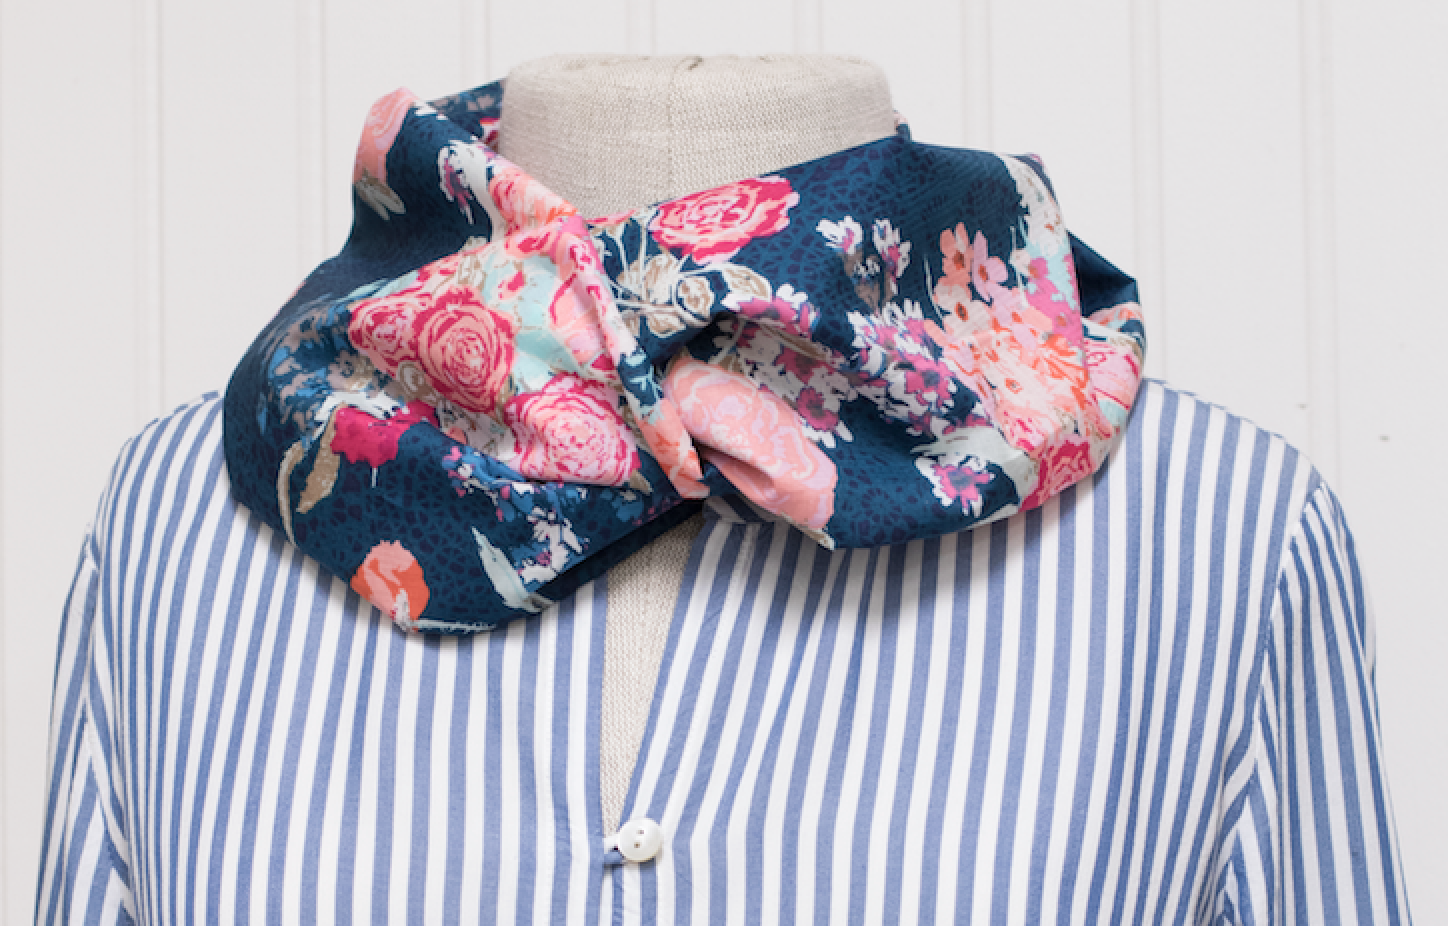
Because the season of gift giving is upon us, I felt you would enjoy learning a quick, non-quilted project that you can easily replicate for those on your gift list. It’s the beautifully intriguing Mobius Scarf, and you’ll be making not one, but two! Different from a circular Infinity Scarf, this scarf is stolen from the geometry world in that it only has one long side. It’s sort of a magic trick, and I show the mathmatical side and definition of Mobius in the video below. (You’ll find the password on the card in your box.)
The fabrics I chose are 100% Cotton Voile by Art Gallery, designed by Katarina Roccella. Cotton voile is sheer, billowy and soft, which makes it the perfect choice for a year round scarf for all day wear. I’m sure you’ll enjoy working with this exceptional fabric every step from start to finish!
French for veil, the proper pronunciation of voile can be heard here, but being from the southern part of America, my pronunciation rhymes with foil, and I can almost make it into a three-syllable word!
Along with the pattern and information card, special items to complete your project are tucked inside your box. In keeping with the French theme, you will also find a Bohin pincushion, shipped directly from France just for you!
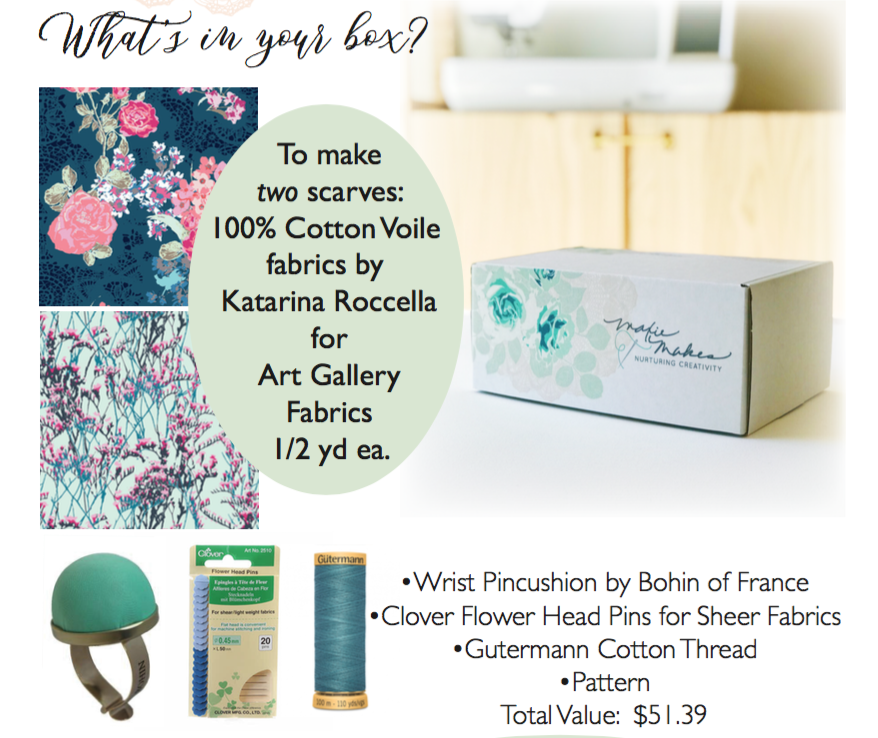
Your new Clover Flower Head pins are designed for sheer fabrics, so store them in your new pincushion to keep them separated from other pins. (Due to their fine gauge, they are great for piecing accuracy, too!) Gutermann’s cotton 50 wt. thread is included in a teal that will blend with both of Katarina’s fabrics (which, by the way are from her Skopelo line). These fabrics are 60” wide, which is perfect for a mobius scarf. Other great fabrics for these scarves include rayon, minkee type fabrics (for colder climates and outer wear), and jerseys. Experiment with substrates and share your creations with us on facebook and instagram (@maxiemakes). Be sure to use #maxiemail when you post!
Thank you for your subscription! Happy sewing and God bless!
Maxie
October 2018 - Hexi zippered pouch
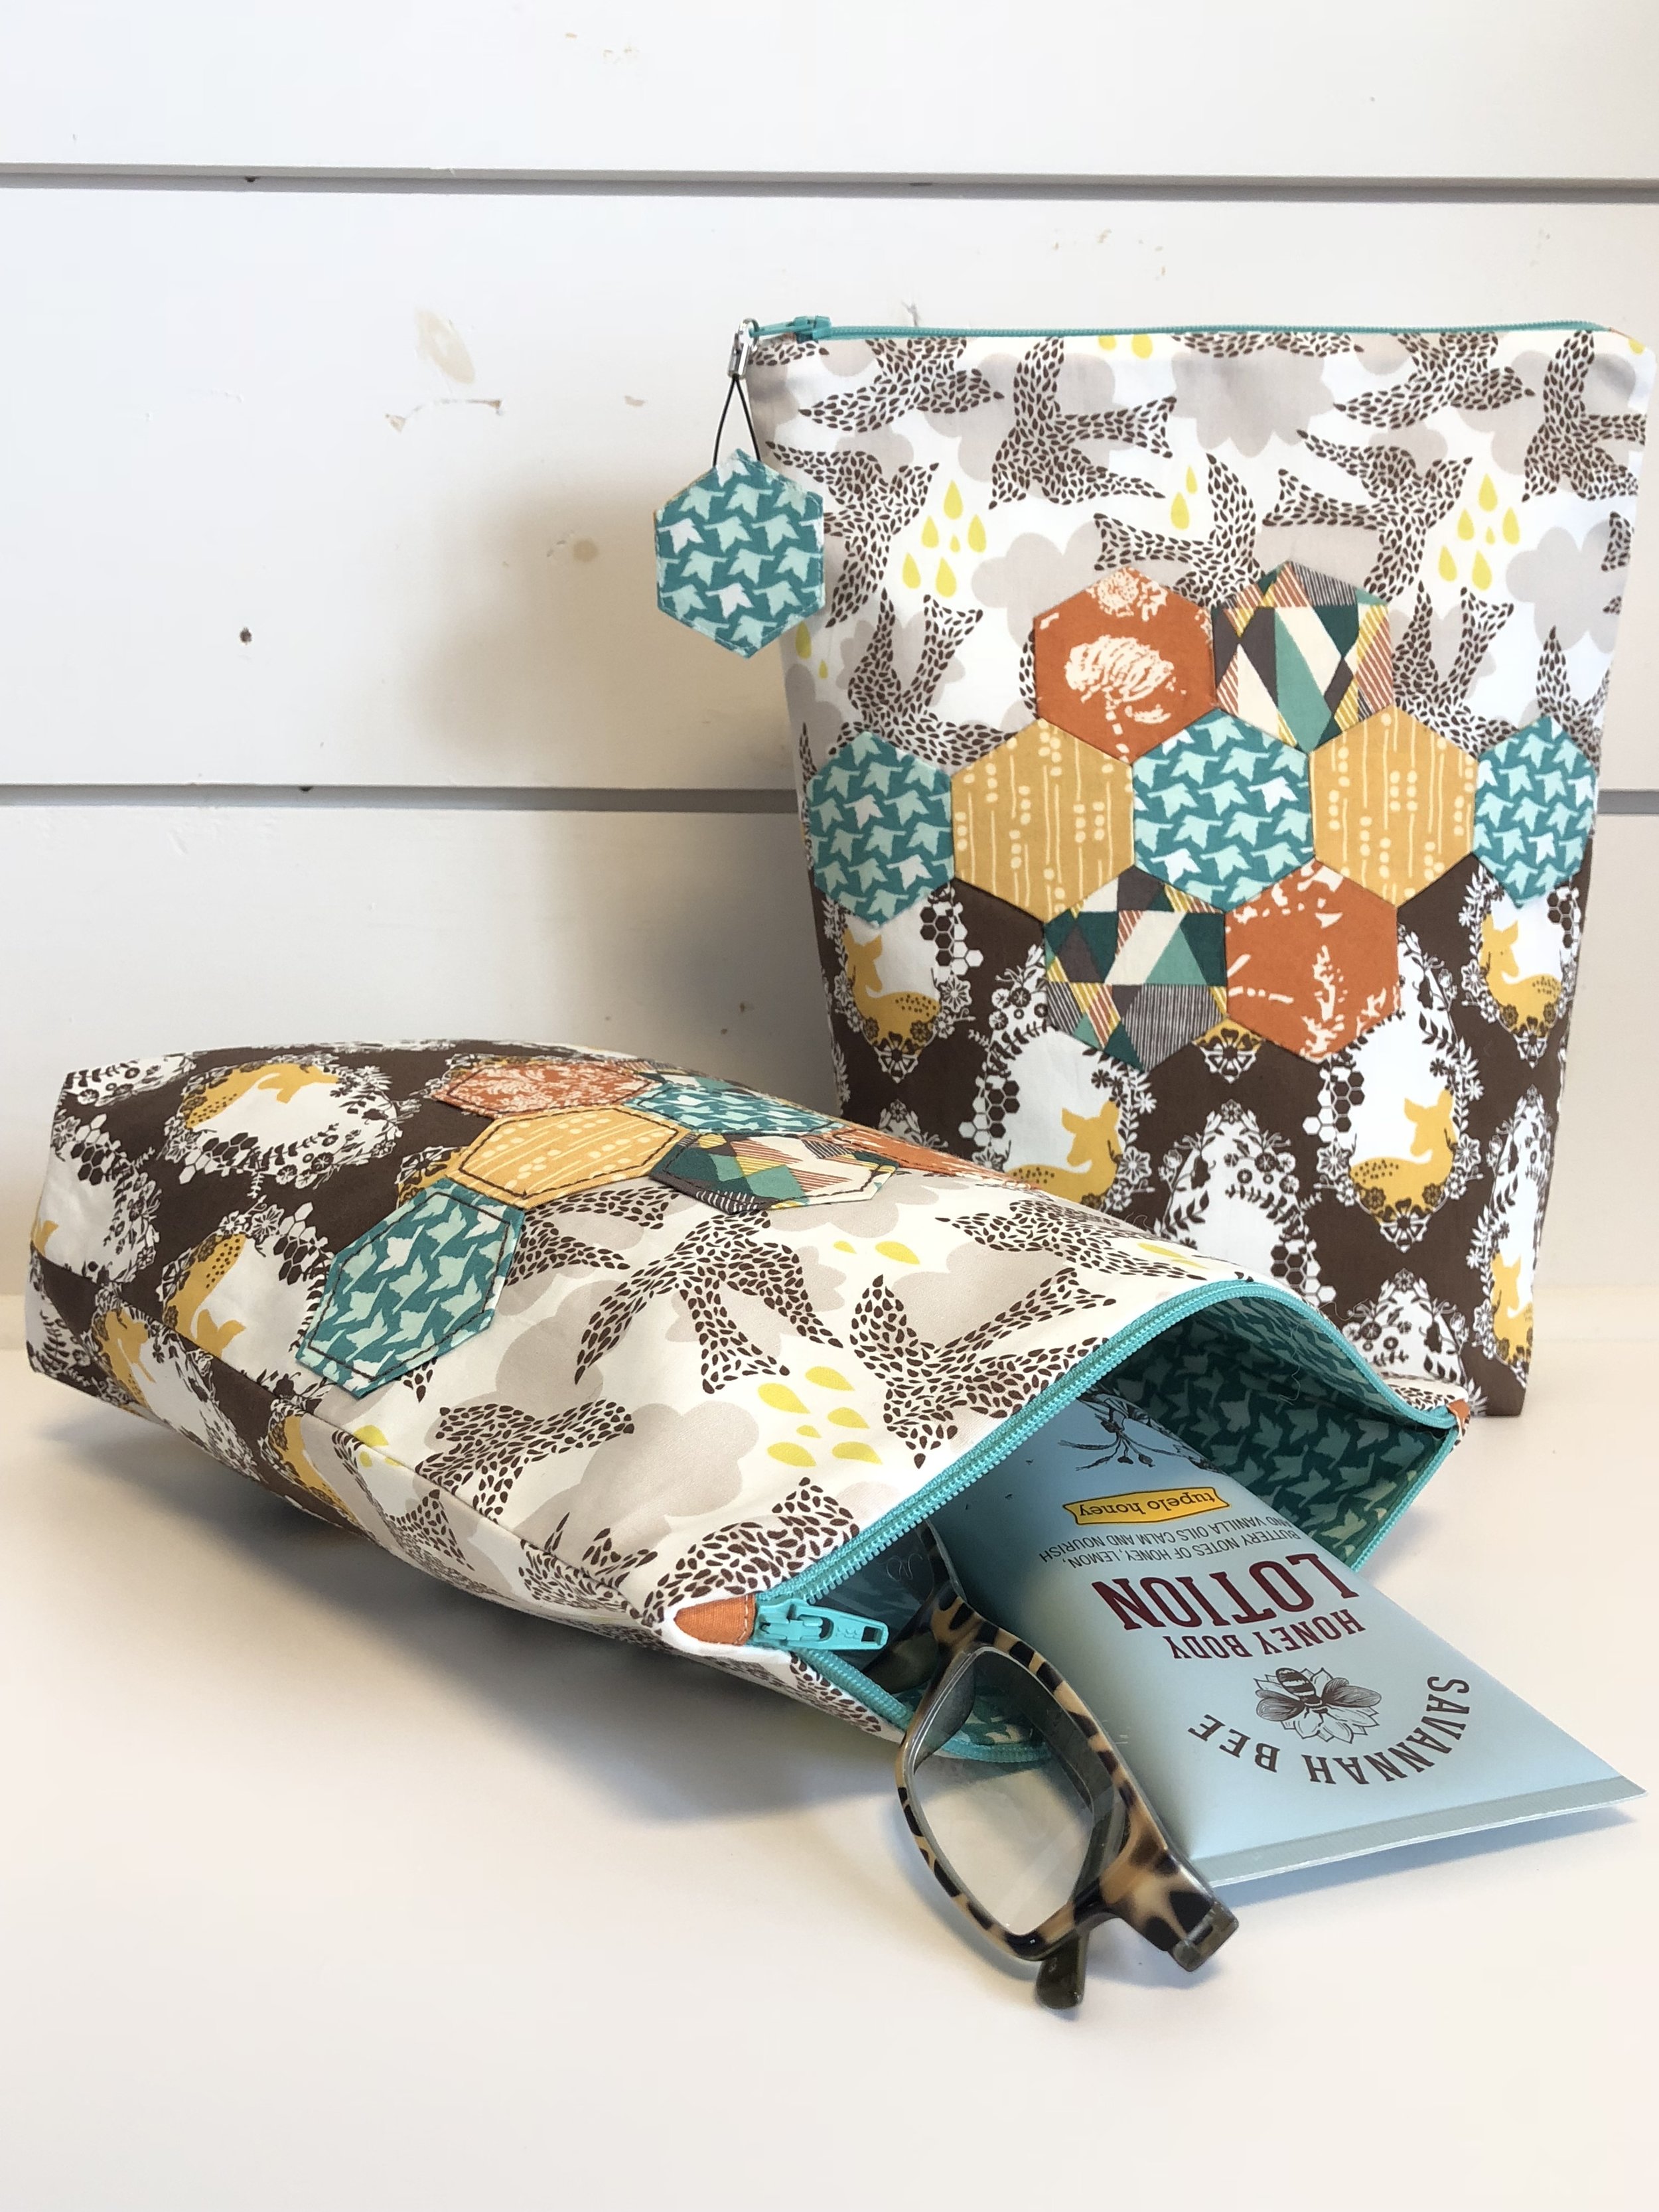
Welcome to October’s Maxie Mail Tutorial! Today’s project is a lined, zippered tote, adorned with English Paper Pieced (EPP) Hexagons and topped off with a hexi zipper pull. Made with fabrics from two lines by Bonnie Christine for Art Gallery Fabrics, I chose colors that speak of the Fall season. There are three videos: (below) the main pouch construction video, the English Paper Piecing video which outlines my preferred methods, and a short video for the zipper pull (hardware is inside your box!).
I’ve been anticipating this month for quite some time and tried to time its arrival so that you might enjoy creating pouches, with or without EPP, in any size for your gift giving this Christmas and beyond!

As for the EPP, I offer options for those hexagons, including a “no-sew” method for those that must skip the hand sewing. And because I’m not a fan of whip-stitched English Paper Piecing, (because stitches are visible on the front) I use an invisible stitch, as shown in the video below. I hope you’ll give it a try!
What’s inside your box:
Art Gallery Fabrics from Bonnie Christine’s Sweet as Honey Collection and Pat Bravo’s Artisan Collection
Pellon SF101 Shape-Flex Fusible Interfacing
Hugs ’n Kisses fusible, water soluble 1” hexagons
Best Press Spray Starch Alternative
Paint Brush
Foxglove Cottage Straw Needles - Size 10
Gutermann thread for pouch assembly
Super Thread’s Bottom Line bobbin thread for EEP and appliqué
14” zipper and zipper pull hardware
Tea

What you will learn:
English Paper Piecing (EPP)
Invisible Applique´
Zipper installation with zipper tabs
Finished lining
Boxed Corners
Making a Zipper Pull
Working with fusible stabilizers
Hexi Zippered Pouch Cutting and Instruction Video Tutorial
(Password is found on the front cover of pattern inside your box.)

Note: Attach your hexi appliqué to the pouch front piece after the stabilizer has been ironed in place and before continuing with pouch construction. See pattern for specific instructions and view the video below:
English Paper Piecing
Making the Zipper Pull
And, just to recap, these items from previous boxes will be very helpful, so grab them and keep them close by:
Olfa Rotary Cutter
Frixion Iron-off marker
1.5” x 6.5” Creative Grids Ruler
Clover’s Stylus
Binding Clips
Thread Heaven
Glue Stick
Please watch for an email from me in the coming week that will include a brief survey for your opinions and wishes for future Maxie Mail boxes! Thank you for sewing with me today.
Blessings to your sewing room, Maxie.
September 2018 - Punched Out Stars

I have two videos for you this month (below!) so, get ready to have fun as you dive into this month’s Subscription Sewing Box! Raise your hand if you love using math to accurately calculate cut sizes for quilt block patches without fear of having to toss the finished block into the orphaned quilt block pile. Me neither. Two “M” words that aren’t usually used in the same quilting conversation are “Math” and “Magic”, but today I’m bringing you not one, but two, magic tricks from the Math Whisperer herself, Cindy Williams of Onion Mountain Quilts and her blog, The Math Whisperer.
Cindy has authored several quilting books, available on her website, packed from cover to cover with charts of equations and formulas, along with beautiful quilt patterns that you can easily grasp, thanks to her simple to understand instructions. You’ll get a taste of her style in this month’s box, because she created our pattern specifically for us, pulling it directly from her book titled Wait…What?, a book of ten quick piecing techniques.
So make that tea, sit back and enjoy the magic show! Then open your box and create a little bit of magic of your own!
Download setting instructions for your quilted pillow top here.
You’ll find the video password on the pattern inside your box.


I’ve included fabrics & batting to make a quilted pillow front, 1/2 yd fabric for the pillow back and necessary tools to create your star blocks as Cindy teaches in her pattern. I like to offer alternate ideas for your finished project, and if you’ve subscribed for a while you’re probably getting good at that game, too. The video below shares my method of sewing an envelope style pillow back, but you might like to use that fabric as a quilt backing and binding. Or, you might choose to make a long table runner, (placing the four star blocks in one row), or use the quilted pillow front as a bag front and the 1/2 yard to complete the bag and handles. Use your imagination, but whatever you do…MAKE THESE STARS! You’ll love learning these two techniques that you’ll use over and over again in your sewing room.
View my easy Envelope Pillow Back tutorial below - no password needed.

Thank you for subscribing to Maxie Mail! I hope you enjoy this month’s project and stow away those techniques for many future projects!
Maxie
August 2018 - The Tony Danza Mini Quilt!
Tony Danza Mini Quilt 16" x 20"
Hello, August members! This month brings a project made from Bonnie Christine’s newest line for Art Gallery Fabrics, Gathered. As you know, Art Gallery Fabrics manufactures one of the best quilting cottons in the industry, using 100% Pima Cotton. Gathered, with its soft, rich hues evoke a feeling of late summer and autumn and will be a perfect accent for your fall decor!
When polling my earlier subscribers for project ideas they wished to see, one request came up several times: Paper Piecing! So, when I planned to offer a paper pieced project I knew right away that I’d call on my good friend, Sarah Overton, of mycrowdednest.blog to bring one of her fun patterns that incorporates her technique of using templates to achieve a stress-free (and no waste) experience! You will enjoy this fun, easy method of paper piecing, so join Sarah and me in my sewing studio as we walk you through every step of the way! (See video below. You'll find your password on the card inside your box!) Note: Your Tony Danza pattern has been emailed to you for your personal use, however, we've supplied all the papers you need inside your box!
Click the photo to enlarge.
A Special Message from Maxie
“I’d like to take a moment to thank you for your subscription to Maxie Mail! To my delight, we started with a good number last October, and over the last few months, our subscriptions have continued to grow substantially. We have always cut our fabrics in-house (I’m ever the control freak) but cutting was becoming not only very time consuming, but physically hard! I began to consider out-sourcing this portion of our box and, through references, I found a service that cuts for many major fabric companies. I hired them for our August project. Thankfully, I ordered over-sized pieces because I am less than 100% satisfied with their cuts. You will not have any problem cutting and sewing your project as ample is supplied in your box; you have more than the required widths on each piece. Please view the video tutorial for a cutting demonstration.
It is important to me that you know that you can expect your future boxes to arrive filled with the same quality products and fabric cuts that you have been accustomed to receiving.
So….let’s sew!”
What's inside your box:
Gathered fabrics for your quilt top and binding, by Bonnie Christine for Art Gallery Fabrics.
Tony Danza Paper Piecing Templates
Tony Danza Block Papers, printed on Carol Doak's foundation paper
6" x 8" Olfa Cutting Mat
Add-a-Quarter Ruler for Paper Piecing
Thread
Tea
What you will learn:
Paper Piecing with templates, producing no-waste and easy fabric placement
Easy method for cutting multiple fabric layers with the supplied templates
Using the Add-a-Quarter Ruler
Precise Paper Piecing techniques
In addition to the video tutorial, below, you can download Sarah's printable tutorial for the Tony Danza block here.

You may Download these layout and sewing instructions by clicking on the image below:

Need help with quilt binding? Click here for my video tutorial and I'll walk you through the process, start to finish!
July 2018 - The Orange Blossom Quilt!

Hello, July Maxie Mail Members! I don’t know when I’ve been so excited to share a project with you as I am today! This month we are tackling the dreaded curved seam as we make Plum Easy Pattern’s “Orange Blossom” quilt! Don’t fear these curves, though, because they are sewn with a fool-proof technique using no pins whatsoever! And you have several options to consider as you complete your blocks; would you enjoy a quilt, or pillows, or maybe a table runner?
I’ve known the owner of Plum Easy Patterns, Deborah Miller, for years and became friends with her through my former quilt shop owner days. (You may remember her from our February Maxie Mail, “Folded Star Hotpad” and Prairie Points!) Deborah’s background in graphic design results in beautifully written patterns and this one is just the kind of project I’ve came to expect from her! Orange Blossom didn't disappoint me in the least!
I handed off a Maxie Mail box to my friend, Sarah Overton, of My Crowded Nest and you’ll love seeing what she’s created with her Orange Blossom blocks! In case you decide to follow her lead, she’s posted a tutorial for her beautifully finished pillows on her blog. You’ll enjoy learning her unique zipper closure technique.
This month’s video offers a range of ideas for you to consider, along with time saving tips that will enhance your accuracy and efficiency, so be sure to watch that before you sew! Click here to download additional setting and project ideas. Click below to view the Orange Blossom tutorial video, using the password printed on your box insert:

Need help with quilt binding? Click here for my binding video (no password needed) for tips to enhance accuracy and speed.
want Additional supplies?

Sewn with Art Gallery's 100% Pima Cotton Pure Elements solids, you'll love the feel of working with these fabrics! And the binding fabric provided in your project box is also Art Gallery Pima Cotton, designed by Bonnie Christine. Want more? Click the image at left!
Want additional Cut Rite Heavy Duty Freezer Paper? I offer the 8.5" x 11" sheets here. Want more die-cut Orange Blossom Freezer Paper? You'll find a set of 10 papers at Plum Easy Patterns. Deborah's papers are identical in size and brand to the papers I cut for you.
Thank you for subscribing to Maxie Mail! I hope you enjoy sewing your Orange Blossom quilt along with me! Be sure to post photos on Instagram (#maxiemail) and Facebook (@maxiemakes) so that we can all see what you make! Until next time! Maxie
June 2018 - "Hold it...You made that cute bin?"

Hold it Bin, shown in Bari J's fabrics. Alternate fabrics for outer and lining, if you like for a co-ordinating set, or make them both the same!
Hello, June Maxie Mail Subscribers!
You are in for a treat this month with a project designed by book author, pattern and fabric designer Dana Willard! In case you’re not familiar with Dana’s work, you’ll want to check out her blog and YouTube channel filled with sewing and quilting tutorials. One of my favorites is her “Hold it Bin” pattern, and we thought you would enjoy it as well. There are two short videos (below) for you to watch; view mine first, as I share your box contents, pattern information* and three helpful tips demonstrated to help you with the construction of this month’s project. You’ll see a loads of inspiration, including about ten different finished projects in various sizes! So watch it until the end and then watch Dana’s for complete, step-by-step instructions! Not only will you love learning the techniques from both videos, you’ll also love using these useful, beautiful bins!
*You will receive Dana’s 80 page pattern/book in an email on June 26, sent from maxie@maxiemakes.com to the inbox associated with your Maxie Mail account. Because of its size, you’ll want to save it to your computer or a flash drive. In my video you'll learn which pages are important to print (there are only 4!), and the rest may simply be read from your computer screen. You do not need to print a pattern to make these large size bins; simply follow Dana’s easy cutting directions. She has included printable pattern pieces for 14 sizes, however, so I’m sure you’ll want to print your favorites!

Small Organizer Hold it Bin, shown in Bari J fabrics.
What’s included for June?
“Hold It Bin” Pattern*
Art Gallery 100% Pima Cotton Fabrics to make a set of two co-ordinating Hold It Bins! Fabrics vary in each box, but are from either Bari J, Katarina Roccella, or Sharon Holland collections.
Pellon Decor Bond stiff interfacing
100% recycled felt interlining
Thread
Wonderclips (must-haves for this project!)
Faux leather for handles
*Please note that Dana Willard’s pattern was individually purchased specifically for you and legal copyrights apply. Please do not share.
Be sure to post your photos, and tag @maxiemakes and #maxiemail and #holditbin on Instagram & Facebook.
No passwords needed to view videos this month!
May 2018 - Cool Tools!
Hello, May Maxie Mail Members! "Use it up, wear it out, make it do, or do without!" I know you've all been waiting for this specially curated box of sewing notions and tools, and I've worked for months gathering items that I felt would you would use up, wear out...and replace because you just can't do without! Owning fabric shops for over 15 years, I never offered gimmicky products because I valued being trusted by my customers to provide quality items that made their sewing easier, more efficient and accurate. When a new notion arrived on the scene I ordered just one to test; they either wound up on my notions wall or in my waste-bin! Everything in your box has passed my test, and you'll see how to use all of them in one project in the short video tutorial below! Next month we will be back at our sewing machine with a fun project and a guest designer from Art Gallery Fabrics!
Here's what you'll find inside your box:
Klassé Needle Assortment with 10 packages of premium sewing machine needles. Visit their website for lots of downloadable helpful tips and charts for proper needle sizes to threads, etc.
Water Erasable Marker by Clover, my favorite marker of all because of its ease and safety of removal from fabrics. (Always remove before pressing with heat.)
Aqua Eraser Pen by Sew Line was introduced to me by my longarmer friend and cohort, Andrea Walker of Walker Quilt Company. We've both seen sad stories regarding marked quilt tops. Your Clover marker & Aqua Eraser Pen get our votes for safest and most reliable! Good news: it's refillable with water!
Tulip Hiroshima Sharp Sewing Needles are more expensive than regular needles, but well worth it! They are the best sewing needle made because of the Japanese engineering designed into the needle. It is polished lengthwise with tiny, invisible grooves, resulting in less needle contact with your fabric, but that's just one of it's many features. Visit their website to read more, and to view a fun tour of the factory, click here!
Thread Magic Thread Conditioner reduces thread drag, tangling and hand fatigue! Pair it with your Hiroshima needle and you'll be sewing at supersonic speed!
Gypsy “Rip It Away” Seam Ripper, another time saver has become my favorite seam ripper for removing straight seams. See it in action in my video below.
To get the most from your new products, please watch the video! (You'll find your password on the insert in your box.)
Thank you for subscribing! Enjoy!...Maxie

April 2018 - Tube Method Sewing!
Hello, April Maxie Mail members! I hope this month's project will lead you to venture into some new sewing frontiers in an unconventional way! Maybe you've made pillowcases in the past with the "Tube Method", but did you know that you can use this method for a variety of other things? If you aren't familiar with this technique, don't worry! I'll walk you through every step with plenty of tips along the way in this month's video tutorial (scroll down to view). Then I'll show you four more types of projects made with this very same fascinating means of creating a finished, enclosed hem. We will make a matching set of two pillowcases with the fabrics included in April's box, which also includes the new "Splash Rotary Cutter", thread, pattern and a few delectable goodies!
Please remember that your subscription is not only for a monthly project and supplies, but for the accompanying instructional video as well! There you will always find numerous tips and techniques that can't be printed on paper patterns, and that's why Maxie Mail is "A Class in a Box"! I'm with you, right there in your sewing room! Enjoy!
I wanted a soft, romantic feel for this month's project, and no one does that better than Verna Mosquera!
Want more of Verna Mosquera's fabrics? You'll find these fabrics here:
Peppermint Rose (body) Peppermint Rose Rosette (hem) Love & Friendship (green accent)
Want additional Pillowcase Kits? Click here!
Tube Method Sewing Video Tutorial
(You'll find the password printed on your pattern inside your box.)

The pattern for the apron shown in the video will be posted here later, so stop by soon!
Thank you for your subscription! Happy Sewing and God bless!
Maxie
March 2018 - Strippy Aunt JOsie...with a bonus project!
This month’s box is packed with 5 gorgeous fabrics and all the items necessary for creating this fun little string block quilt. The inspiration for this quilt comes from a string quilt I found in my mother’s possession, made by her Aunt Josie. Most string blocks are made by piecing strips onto a muslin foundation square, which is not only time consuming, but leaves the quilt heavy with the extra layer of fabric inside. I set out to streamline the process using strip sets without a foundation, resulting in a faster, lighter, more accurate (foolproof) method! And a little bit of frosting on this cake is that a bonus project is included, made from the cutting scraps! I hope you enjoy this process as you create not one, but two mini quilts! View the video and grab a couple of downloadable .pdf files for different options below!


Look for your video password inside your box, on the front cover of your pattern!
You’ll find the video password tucked inside your box, printed on the pattern front. In this video you’ll see lots of tips for sewing and pressing, and I also share how to use this technique to make any size quilt block, allowing you to make a much larger quilt in record time! Like the one pictured below that uses 8” blocks! (See those bonus blocks in the outer border?)

Photos by Art Gallery Fabrics for Hello, Ollie's Lookbook. Fabrics by Bonnie Christine
If you’d like to increase the size of your quilt using 4” blocks, you’ll find additional fabric packages here at the cost of $16.99. Each package yields 18 blocks, with 36 side triangles for bonus blocks, and 9 bonus blocks. Keep those bonus blocks in mind, because they can be added to the sides of your quilt or made into a separate quilt.

You'll see the strip arrangement in your pattern and also in the video, but if you'd like to see how different your quilt will look with alternate strip set arrangements click here!
The setting style shown above is outlined in the video and pattern, but if you'd like to see different setting styles for your Strippy Aunt Josie blocks click here!
Thank you for your subscription! Happy sewing and God bless! Maxie
Thank you for your referrals during “February Friends - Share the Love” subscription days! Both the referred and the referrers will find double fabric inside this month’s box!
February 2018 - Prairie Points and the folded Star
Prairie Points have certainly been around the block, no pun intended, but in this month's box we are bringing them into new light with Deborah Miller's Folded Star Hot Pad Pattern. I've made lots of Folded Stars over the years, but Deborah has transformed this staple unit with a fresh technique that I think you'll enjoy learning. In your box you'll find a kit with pre-cut fabrics and other supplies you'll need to make your own beautiful Folded Star project. With zero cutting and minimal sewing, you’ll be finished with your project in record time! Just open the box and dive in! Note: Please note that the video passwords are no longer on this website, but are packed in your Maxie Mail box. You’ll find this month’s password on the fabric key sticker on your Folded Star kit. The only video you’ll need the password for is the Prairie Point and the Folded Star video. The Continuous Prairie Point video (both videos are below) needs no password.

Folded Stars would be beautiful on a variety of other projects, for example, a bag front or a pillow front. You’ll find 6 additional templates included in your box this month, so use your imagination and please tag Maxie Makes on Instagram and Facebook to share your creations with everyone!
In addition to Deborah’s Prairie Point method, I’m sharing an additional video that will teach you how to create Continuous Prairie Points. This method yields 42” of connected points from one strip of fabric! You’ll find both videos below.
Want more kits like the one in your box? You’ll find them here.
Want the Prairie Point Turner by Susan Cleveland (shown in the subscriber's video)? You'll find it here.
Want a complete box for a gift for someone else or a for yourself? Subscribed members may purchase current and past boxes (based on availability) here.
Thank you for subscribing! Enjoy Prairie Points! Happy sewing and God bless, Maxie

January 2018 - Fun With Labels!
“Don’t let your quilt story fade away"...a quote from quiltalliance.org.
Ready for fun? This month I’m sending something your way that I believe will stay with you for your entire quilting and sewing journey! We’re talking about labeling our work, whether quilts, bags or many other types of sewing. In the TWO videos below, I show you not only how to use the Quilt Label Collective CD that’s included in your box, but how to make your labels beautiful and meaningful. This CD has 150 quilt labels for you to personalize and use on any project you desire! I've also included a special “QR Code” label, made especially for my subscribers, that connects your label to a video message from you! Can you imagine how meaningful it would be for your recipient to be able to scan the QR code on your quilt label and instantly view your video message any time they wish? What could your video feature? Your video could simply share information about the quilt (your name, the date, fabric information, etc.), but I think that a video quilt label should share the essence of why we make quilts. Here are a few suggestions:
A wedding message to the Bride and Groom
A loving message from Grandparents to a Grandchild
A message from Mom to a college-bound child
A group of family or friends singing "Happy Birthday" to the quilt recipient
A get-well thought
Your special memories for a Sympathy Quilt Recipient
"Document, Preserve, Share". Another quote from the Quilt Alliance Website. Michael Newman is the founder of Story Patches, the company that made our special QR Code quilt label. Also a member of the Quilt Alliance Board of Directors, Michael's mission is to help us document our quilts and projects in meaningful ways. For more information about how to use your QR Code label with your smart phone or iPad, be sure to watch the video below, and click here for easy instructions.
Watch Fun with Labels - Password: labelsforlife

Not sure how to use that great CD in your box? No problem, just watch the short video below and watch as I load designs from the CD into my word processor and add text, resize and print! No password needed, just click and enjoy!
Note: the stkr.it website, which is a sister website to storypatches.com, sells QR codes that you can download and print! They are only $.99 for twelve (12) codes, so why not purchase them and print them on labels from your Quilt Label Collective CD! Simply add them as an image to the label in your word processor!
Click here for a .pdf file of tips for using your QR Code label.

Want to order more supplies? You'll find Electric Quilt Printable fabric, the QR Code label and additional January boxes on my shopping page. Don't you think the January box would make a great gift for another quilting friend? I have a limited supply on my website, and they are offered to subscribers only, at the regular subscription price.

Thank you for subscribing! Have fun with labels! Happy sewing and God bless, Maxie
December 2017 - Dabbling Swan Quilt and Pillow
This month's box includes a beautiful little quilt made from Art Gallery fabrics, designed by Bonnie Christine. This line, "Hello, Ollie" is 100% organic cotton with a most luxurious feel! I've enclosed everything needed for the top and binding, plus a few other necessary notions and goodies. You've no time to make a quilt and bind it? No problem! You can choose to make this quilt in one of two ways: 1: traditionally pieced and quilted, and finished with binding on the edges, or 2: traditionally pieced, turned and tied with no binding! The video features the tied version, which I made in just one evening! Please watch the video before deciding which version you'll make...I think you will fall in love with tied quilts if you give it a try! Need help with binding? This month features a bonus video tutorial, "Binding the Quilt", included below the Dabbling Swan Quilt Video. This video is not password protected and will always be accessible with future boxes featuring quilting projects.
Bonnie Christine also designed a beautiful cotton Tea Towel that coordinates with her fabrics, and I've tucked it inside the box, too! Whip it into a matching pillow in a matter of minutes to compliment your quilt!
Password for the Dabbling Swan Quilt: HelloSwan


You'll find the pattern for the Tea Towel Pillow here! I hope you enjoy your December project! Please remember to post a photo on Instagram or Facebook of your finished quilt. Happy Sewing and God bless! Maxie
November 2017 - Buck Forest Pillow
You'll find your bonus content for November below, which includes a video tutorial, a printable file of various quilting designs for your pillow and a printable file of your pattern. This month you'll learn fusible free-motion appliqué, free motion quilting (with your new gloves!) and how to construct an envelope pillow. Let's sew together!
Here are the items and value included in your box:
Pattern $6.00
Buck Forest Appliqué $10.00
Pillow Back 6.50
Pillow front 4.00
Thread 2.10
Batting .75
Thera-Gloves 32.99
Total Value $62.34!
I hope you enjoy making your Buck Forest Pillow as much as I did! Thank you for subscribing! Enjoy!
November Video Password: Buckaroo

Need quilting ideas for your pillow? Click here to download my ideas!
Want to download the pillow pattern to your computer? Click here to download the pattern.
Want more Buck Forest Appliqués? You'll find them here!
October 2017- Mug Rug
Here is your bonus content for October, which includes a video tutorial, recipes for your mug, quilting design suggestions for your mug rug, and the .pdf file for the pattern in case you misplace your hard copy! October's Maxie Mail box contains a fun project, some wonderful tools and some goodies for you to enjoy! Here's what's in your box:
A ceramic mug, designed especially for our box by Bonnie Christine.
Matching fabrics, also designed by Bonnie Christine, to make the Hexagon Mug Home.
Hexagon Mug Home pattern.
Duckbill Appliqué Scissors
Patch Stick fabric glue stick
Gutermann 100% cotton thread.
Goodies!
And, if you were an early subscriber, a gift package of my favorite flower head fine pins are included for you!
To view the video, enter this case sensitive password:
OctMaxieMail

Want a couple of great recipes for your new mug? Click here to download a couple of my favorites!
Want some quilting ideas for your new mug rug? Click here to download 5 suggested designs!
Want to keep the Hexagon Mug Rug pattern on your computer? Click here to download the pattern!
Thank you, again, for subscribing to the Maxie Mail Subscription Sewing Box! Let's sew together!
Maxie