How to Create Gentle Gathers

I am a quilter, but garment sewing is my first love in the sewing world. You probably know that I have a little grandson, Bear, who is expecting a baby sister in about 4 weeks! I love sewing for Bear. In fact, I made a pillow case for him today, from a print filled with elephants and monkeys. He loves it. But sewing for a girl is different, and I'm very used to that because I had two daughters! So gather 'round, everyone! Today we are gathering!

How to sew a sleeve into a garment.
Setting a sleeve into an arm opening.

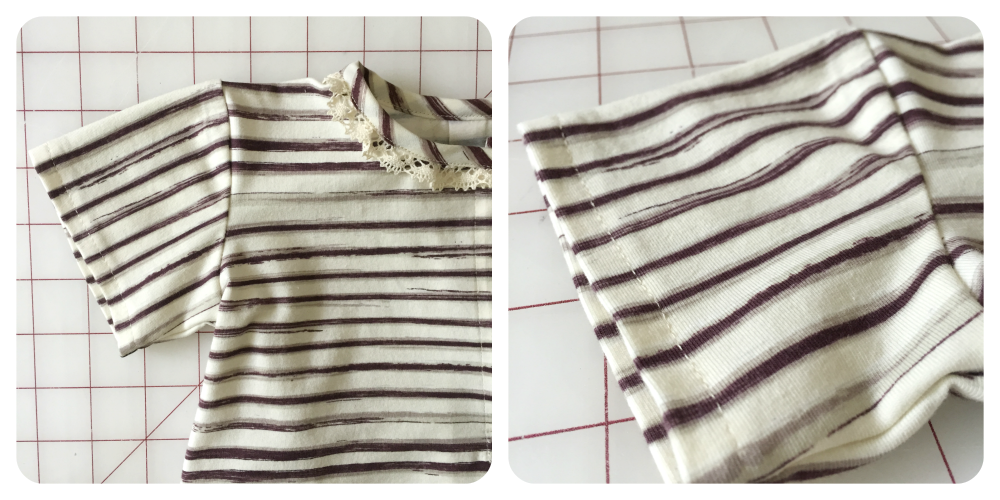
So, here's what that sleeve and armhole opening look like before they are sewn together. You can see that the sleeve's curved edge is larger than the arm opening edge (above left). What to do about that? The sleeve cap (the upper curved edge) must be gathered to fit. This allows the sleeve cap to curve over the bend of the shoulder at the top of the arm. It's easy to do, and all this little sleeve will need are gentle gathers, not puffy, full gathers. I accomplish this easily by stitching along the curved edge and, at the same time, holding my index finger firmly behind the presser foot, pushing the fabric that feeds through into the back of the presser foot. This creates gentle gathers, as shown below in the video:

After gathering, place the sleeve cap edge, right sides together, against the arm opening. Match any dots or notches transferred from your pattern and pin in place, (as shown in the photo, above right). If you still need to gather a bit more, pull gently on the bobbin thread and distribute the fullness. Stitch in place. Easy as pie!

Thanks for visiting! Happy sewing and God bless! Maxie

On Pincushions

I am a collector of pincushions, and many of my friends know it! I've been gifted with very beautiful pincushions, I've made some and bought some, and I use them! I like to keep one at every station in my sewing studio so that I'm not constantly searching for pins. Here are a few from my collection.

My pincushion collection.

But, realistically, this is what happens at the sewing machine.

Pins accumulate on my sewing machine bed.

It can take so long to pick them up, then pick up the ones that slipped through my fingers and onto the floor, and arrange them into the pincushion. So, I added one more pincushion to my collection.

There are many brands, but this one from Dritz has a little secret drawer on the bottom for chocolate. The package said it was for extra pins, but this just made more sense to me. And yes, I eat them straight from the bag.

My favorite magnetic pin caddy holds my pins and my favorite treat!


So, collect many pincushions and use them all, but have at least one magnetic pin caddy for quickly picking up loose pins. It's very easy to transfer them from the magnetic one to a fabric one because the pin heads stay together!

Thanks for visiting! Happy sewing and God bless! Maxie

How to Match Fabric Patterns in Seams

Many times a seam is required to make strips or borders long enough for our quilting projects. When using a patterned fabric, sometimes those seams are less than attractive, and if I know it's there, my eye falls right to it before it sees anything else! Here's a little tip to make those seams invisible! I use this technique almost every time I have to sew patterned fabric together. (I have a video planned to show you how to piece a quilt back with an invisible seam!)

Step1

Sometimes we can get away with a diagonal seam to camouflage the join, but not so with this fabric.

IMG_3436.JPG

I cut the two strips shown above in the same place from the yardage. (meaning that I used the same rows of bugs for each strip. Doing this ensures that I can find a spot in the pattern repeat where the bugs will line up exactly.) Make a nice, straight cut across the fabric at the end of one of the strips.

Using a spray starch alternative (Flatter is my favorite; plant based, no toxic stuff in my fabric), press the edge that you just cut to the wrong side of the fabric.

Look closely at the spot the stylus is pointing to...I've lined up the bugs perfectly by finding where that pressed edge matched the pattern in the strip I want to attach it to. The next step is to use a fine line of basting glue to hold the edges together. I've not pictured this step, but lift up the top folded edge and place the glue just on the underside edge of the fold. Use only a very thin line of glue. Carefully replace it and press it with the iron to dry the glue.

Here's a look at the two strips glued together, with the top strip flipped back so that you can see the nice crease that pressing has made.

IMG_3452.JPG

Take the strips to the sewing machine and stitch them together, right in the crease. Trim the excess fabric away, leaving a 1/4" seam allowance.

Done.

Thanks for visiting!

Maxie Makes the Sentimentalities Quilt!

Hello! I have a fun quilt to share with you today. This is a quilt that my daughter, Bonnie Christine, and I designed for her fabric line, Reminisce, for Art Gallery Fabrics. The original concept was Bonnie's, and I have to admit that I was a wee bit daunted at the idea of drafting the pattern. I turned, dubiously, to my EQ7 software for help. The result made me love EQ7 more deeply than ever! Another great tool that made this quilt a breeze to make is Marilyn Doheny's 24" 9º ruler. I'll show you just how easy it is to use in the video below, and you'll find the ruler, along with several other featured favorite products on my shopping page. You'll see the quilt made in Bonnie's Sweet as Honey fabrics as well, and, I have kits available in both fabric lines shown! You'll also  find lots of tips and techniques that will help you in many other quilting and sewing applications, so grab a cut of tea and enjoy! Be sure to share if you like it, and leave me a comment; I'd love to hear from you!

Here are a few photos of both versions used in the video. While Reminisce is a softer, pastel palette of florals, Sweet as Honey offers more intensity and whimsey with beehives, bees and deer. I had so much fun quilting it on my Handi Quilter Avante´, and I was so blessed to win 1st place for machine quilting!

PicMonkey Collage.jpg

Thanks for visiting today! Happy sewing, and God bless!