
When Art Gallery Fabrics posted a picture of Keds that had been covered in Bonnie Christine's Cultivate fabrics, requests came in for a tutorial. The shoes in question were made as a display for Bonnie's booth at International Quilt Market, by yours truly! I'm happy to share the process with you today, and I think you'll find it surprisingly easy! Note: because Art Gallery fabrics are printed on fine pima cotton with a high thread count, they work great for this (every!) project.
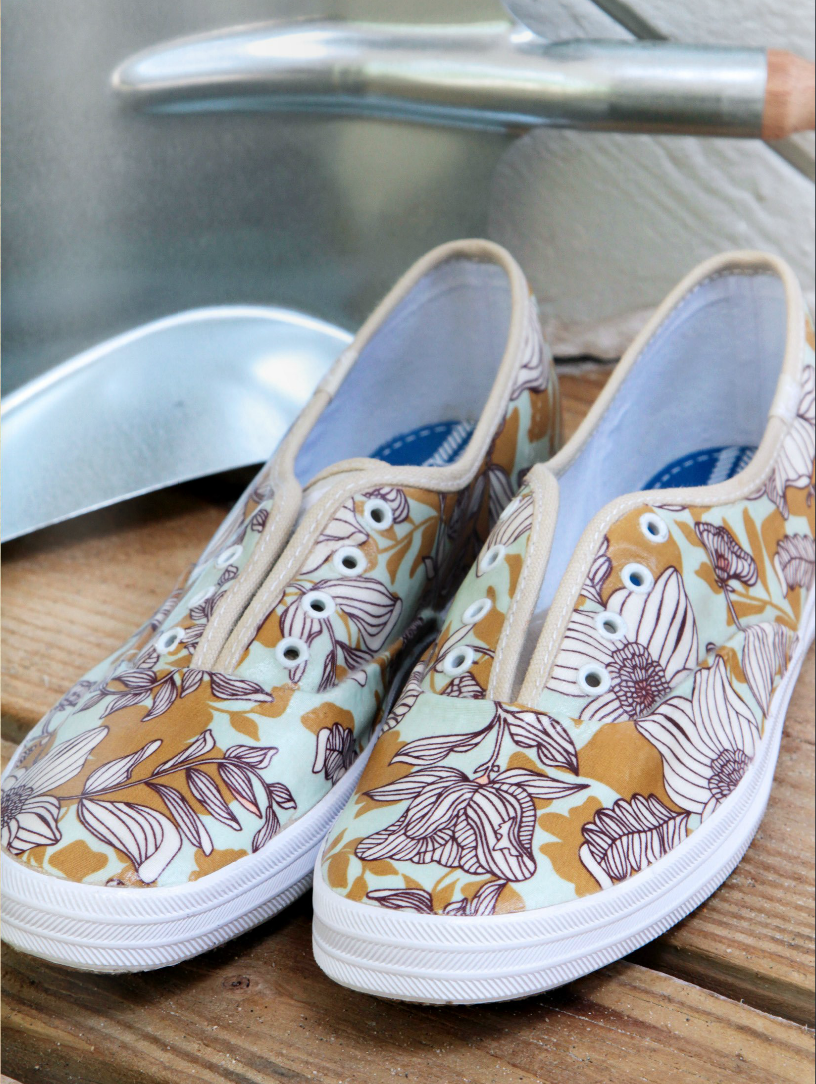
Photo by Art Gallery Fabrics
Supplies:
- Keds or similar canvas shoes
- Beautiful fabric...I suggest any of Bonnie Christine's fabrics for Art Gallery!
- Mod Podge, available online or in craft stores. I used the regular matt formula.
- Sponge brush
- Exacto Knife
- Sharp awl
- Transparent paper for creating a pattern. I used pattern tracing paper, available at sewing stores.
- Pencil & scissors
Visually divide the shoe into segments. Keds are easy to divide because the pieces that were sewn together to make the shoe overlap and are obvious. Using pattern tracing paper, or similar transparent paper (interfacing or stabilizer would work well, too), make a pattern piece for each segment by pressing the paper next to the segment you are working on and tracing around the edges. The style shoe I used required 3 pattern pieces: a left side, a right side, and a toe. The shoe's center seam in the back was sewn flat, so I let the pattern pieces overlap at that seam 1/8". Let your pencil trace just inside the raised edges and to the sole edges. Cut the shape out of the paper, just outside (about 1/8") of the drawn lines. You want this pattern to be over sized a bit so that you can trim the fabric to fit the shoe.
Use the pattern pieces to cut the shapes out of the fabric you've chosen to cover the shoe.
Beginning with the left or right side, use the sponge brush to put a coat of Mod Podge over the canvas area to be covered. Only cover the area you're working with, and go sparingly here, you want it to be very smooth.
Press the fabric over the shoe, smoothing it with your finger or a the back of a spoon. While the Mod Podge is still wet, fit the piece of fabric to the area by trimming exactly up to the raised seam, the binding trim around the top, and to the edge of the rubber sole. Remember to let the two side pieces overlap each other about 1/8" at the center back seam. To cover this overlap, I folded a 1" strip of fabric into thirds, hiding the raw edges, and glued it in place with Mod Podge. Carefully trim around the shoelace eyes with the exacto knife.

Photo by MaxieMakes
Cover the toe area last. Your piece should go up and over the raised seam and overlap the side piece just a little. Use the exacto knife to trim to the side fabric. The knife can push just the edge of the fabric underneath that raised seam and it will look very smooth. Don't worry if you see a raw edge because the Mod Podge will cover it and make it all smooth.

Photo by MaxieMakes
Let the shoe dry completely. Sand it with a fine grit sandpaper and coat the fabric pieces with another smooth layer of mod podge. Let dry and sand again. If desired, coat one more time.

Photo by Art Gallery Fabrics
Now, put on your shoes and go to town! Thanks for visiting! Happy sewing and God bless, Maxie.
